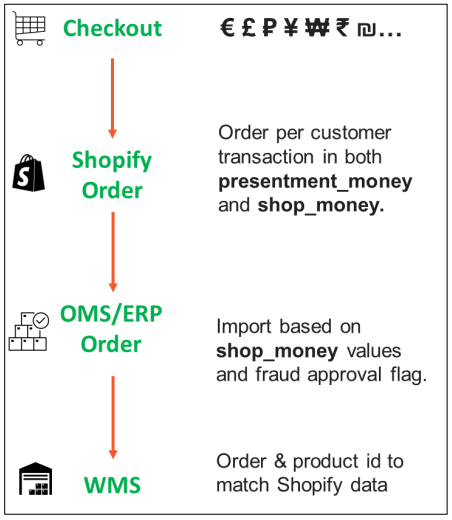
 **Fraud check**
Global-e performs a fraud check for international orders.
1. Initial order creation has the payment status **PENDING** (financial\_status property).
**Important:** Merchants should not submit any orders for fulfilment at this time and wait on Global-e to complete the fraud check.
2. When the fraud check is completed, the payment status is updated to **PAID**. Orders may now be submitted for fulfilment.
**WMS and operations**
For Global-e to generate international shipping labels & customs documents, the warehouse pick-pack process must reference Shopify’s order name and SKU.
Alternatively, the Shopify order number and/or Shopify EAN/barcode/variant ID may be used instead.
Reach out to Global-e as additional configuration may be needed in those cases.
**When a shopper places the order on the checkout page:**
* Shopify creates an order.
Shopify Order Status: `Paid`
* Global‑e creates a matching order on the Global‑e Merchant Portal.
Tag: `Globale::Pending`
* Global‑e verifies the payment and customer fraud status.
Order Status: `Paid`
Tag: `Globale:: Approved`
This tag indicates that you can fulfil the Global-e order.
If for any reason, the order or the payment is not authorised, Global‑e can cancel the order, in which case, the Shopify status shows: `Cancelled`.
## End-to-End Order Flow Interfaces
A general illustration of an order flow with Shopify to OMS to WMS and Global-e in the picture.
**Fraud check**
Global-e performs a fraud check for international orders.
1. Initial order creation has the payment status **PENDING** (financial\_status property).
**Important:** Merchants should not submit any orders for fulfilment at this time and wait on Global-e to complete the fraud check.
2. When the fraud check is completed, the payment status is updated to **PAID**. Orders may now be submitted for fulfilment.
**WMS and operations**
For Global-e to generate international shipping labels & customs documents, the warehouse pick-pack process must reference Shopify’s order name and SKU.
Alternatively, the Shopify order number and/or Shopify EAN/barcode/variant ID may be used instead.
Reach out to Global-e as additional configuration may be needed in those cases.
**When a shopper places the order on the checkout page:**
* Shopify creates an order.
Shopify Order Status: `Paid`
* Global‑e creates a matching order on the Global‑e Merchant Portal.
Tag: `Globale::Pending`
* Global‑e verifies the payment and customer fraud status.
Order Status: `Paid`
Tag: `Globale:: Approved`
This tag indicates that you can fulfil the Global-e order.
If for any reason, the order or the payment is not authorised, Global‑e can cancel the order, in which case, the Shopify status shows: `Cancelled`.
## End-to-End Order Flow Interfaces
A general illustration of an order flow with Shopify to OMS to WMS and Global-e in the picture.
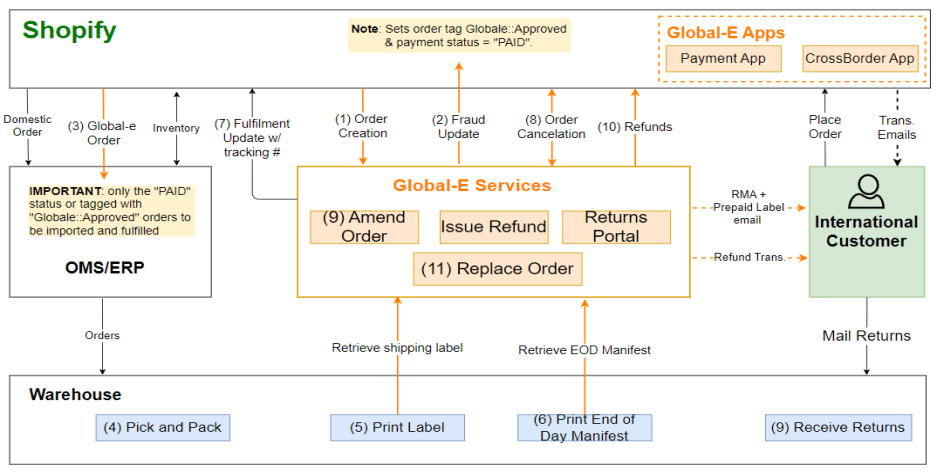 **Outbound**
* **Order creation**: created in Shopify with initial payment status 'PENDING’ and order tag ‘Globale::Pending’.
* **Fraud check**: upon successful fraud check (asynchronous process), the payment status goes to ‘PAID’ and the order tag is replaced with ‘Globale::Approved’.
* **Export to OMS/WMS qualified orders**: with ‘PAID’ status or tagged with Globale::Approved.
* **Pick and pack**: used by the warehouse to identify orders via the Shopify order name/number and sku/upc.
* **Label generation**: Global-e interface provides a final mile carrier label and a tracking number.
* **End-of-day manifest:** signals to Global-e that the order is ready to be dispatched and generates an end-of-day document.
* **Fulfilment update to Shopify**: in most scenarios, this event or the tracking number itself is provided by Globale. It is also expected for Shopify to send the shipment confirmation email when its fulfilment is created.
## Global‑e Order Information
**To view the Global-e order information:**
1. In the Shopify Admin, go to Orders.
The Orders screen opens, showing the list of orders (Global-e and non-Global-e Orders).
2. Click a Global‑e Order.
The Global‑e order details screen opens.
**Outbound**
* **Order creation**: created in Shopify with initial payment status 'PENDING’ and order tag ‘Globale::Pending’.
* **Fraud check**: upon successful fraud check (asynchronous process), the payment status goes to ‘PAID’ and the order tag is replaced with ‘Globale::Approved’.
* **Export to OMS/WMS qualified orders**: with ‘PAID’ status or tagged with Globale::Approved.
* **Pick and pack**: used by the warehouse to identify orders via the Shopify order name/number and sku/upc.
* **Label generation**: Global-e interface provides a final mile carrier label and a tracking number.
* **End-of-day manifest:** signals to Global-e that the order is ready to be dispatched and generates an end-of-day document.
* **Fulfilment update to Shopify**: in most scenarios, this event or the tracking number itself is provided by Globale. It is also expected for Shopify to send the shipment confirmation email when its fulfilment is created.
## Global‑e Order Information
**To view the Global-e order information:**
1. In the Shopify Admin, go to Orders.
The Orders screen opens, showing the list of orders (Global-e and non-Global-e Orders).
2. Click a Global‑e Order.
The Global‑e order details screen opens.
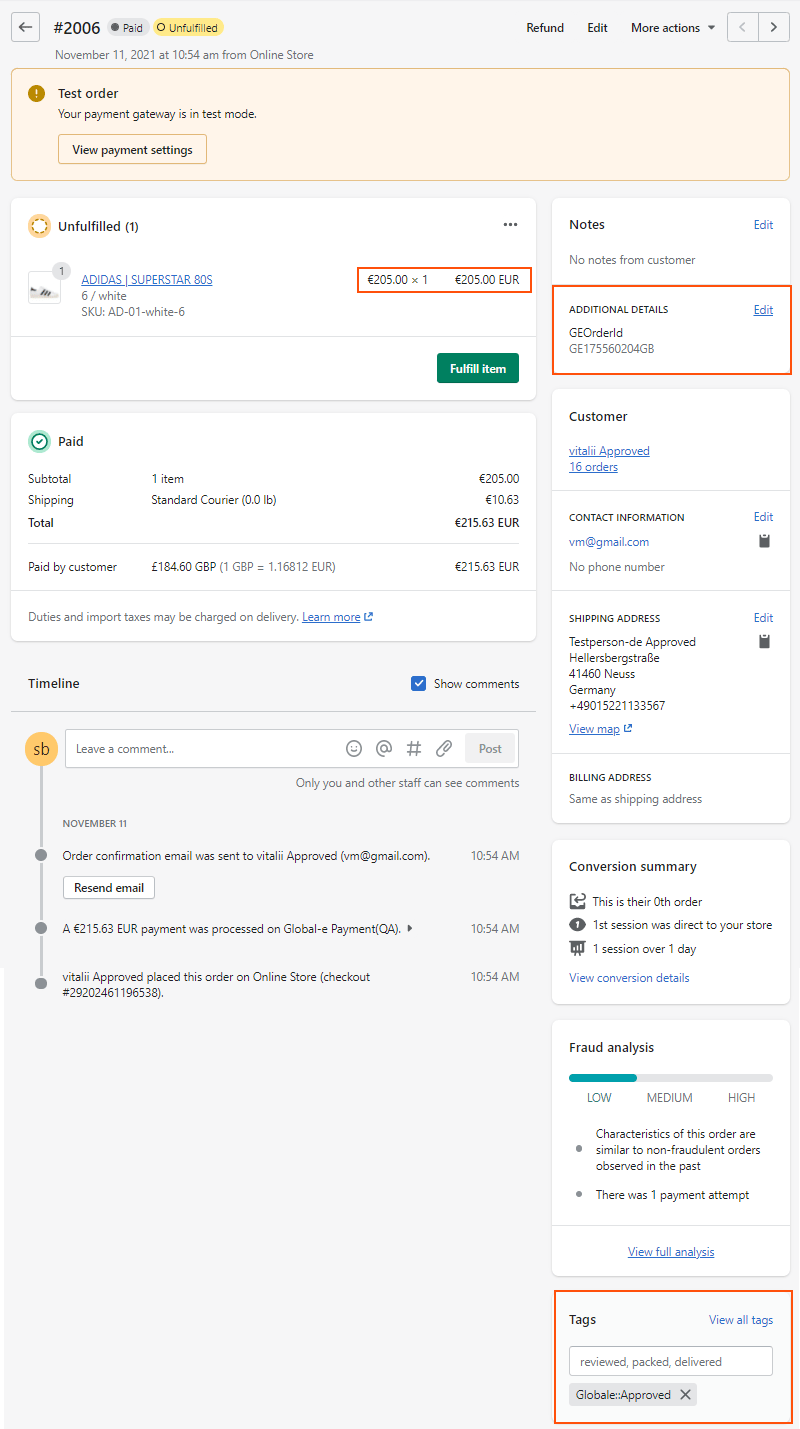 The Global‑e details screen provides the following information:
* The `Global‑e Order ID` (under Additional Details). The Global‑e Order ID starts with `GE` and ends with the merchant's country code. In this example, the Global‑e Order ID is **GE**175560204**GB**.
* The price that the shopper paid in local (customer) currency. In this example, the price is €205.00
* The duties and taxes in merchant and shopper currencies
* Customer Information
* When fulfilling the order, this screen shows both tracking Information and a tracking link. In addition, the order shipment information shows the tracking number.
* Global‑e order tag: `Globale::Approved`.
* Order Status. See [Global-e Orders in Shopify](/global-e-orders-in-shopify) for more information on statuses.
### Shopify Order Data Examples
This Shopify store belongs to a US merchant and the storefront currency is in USD.
Below are two different order scenarios in which a single product is purchased:
* Duties & taxes are paid by the customer – the checkout explicitly displays D\&T-related line items.
* Duties & taxes are inclusive/baked into product prices – the merchant subsidizes the D\&T costs.
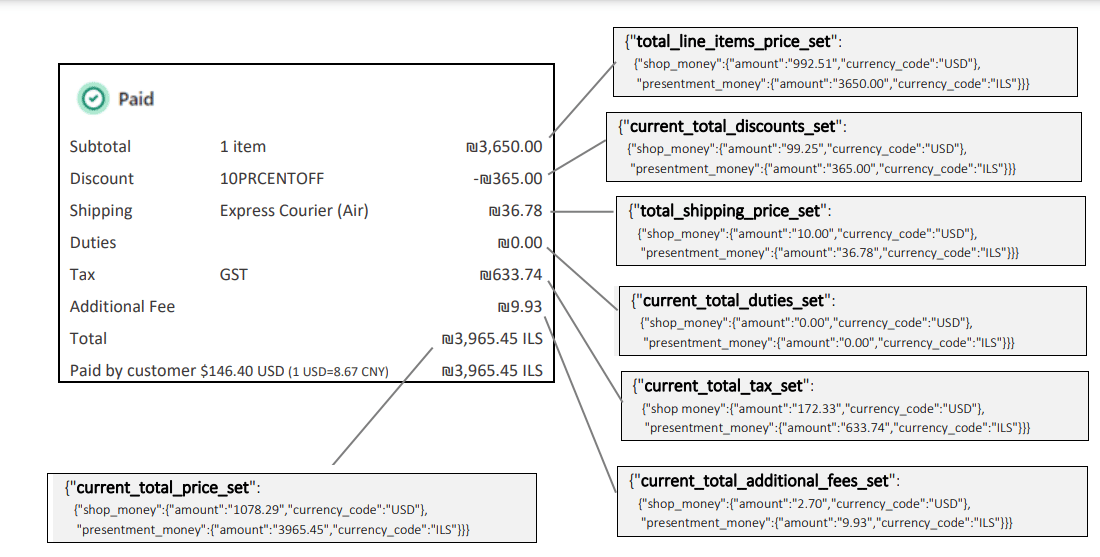
**Scenario 1: Duties & taxes paid by the customer**
Market: Israel.
The customer pays separately for all the D\&T-related costs including the customs clearance fee (CCF) represented here in the “Additional Fee” field.
The Global‑e details screen provides the following information:
* The `Global‑e Order ID` (under Additional Details). The Global‑e Order ID starts with `GE` and ends with the merchant's country code. In this example, the Global‑e Order ID is **GE**175560204**GB**.
* The price that the shopper paid in local (customer) currency. In this example, the price is €205.00
* The duties and taxes in merchant and shopper currencies
* Customer Information
* When fulfilling the order, this screen shows both tracking Information and a tracking link. In addition, the order shipment information shows the tracking number.
* Global‑e order tag: `Globale::Approved`.
* Order Status. See [Global-e Orders in Shopify](/global-e-orders-in-shopify) for more information on statuses.
### Shopify Order Data Examples
This Shopify store belongs to a US merchant and the storefront currency is in USD.
Below are two different order scenarios in which a single product is purchased:
* Duties & taxes are paid by the customer – the checkout explicitly displays D\&T-related line items.
* Duties & taxes are inclusive/baked into product prices – the merchant subsidizes the D\&T costs.
**Scenario 1: Duties & taxes paid by the customer**
Market: Israel.
The customer pays separately for all the D\&T-related costs including the customs clearance fee (CCF) represented here in the “Additional Fee” field.
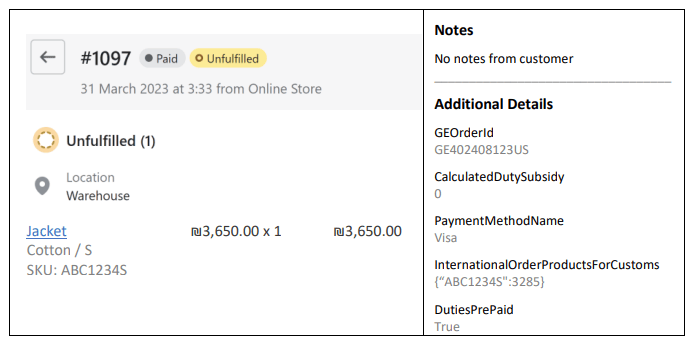
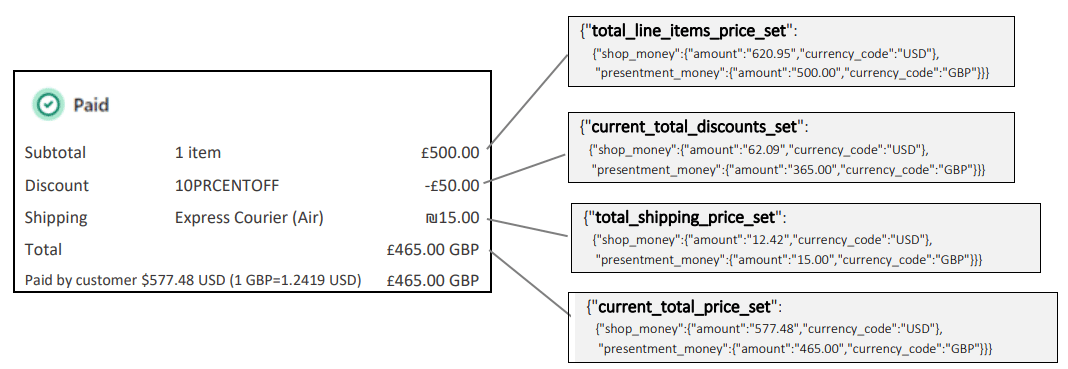
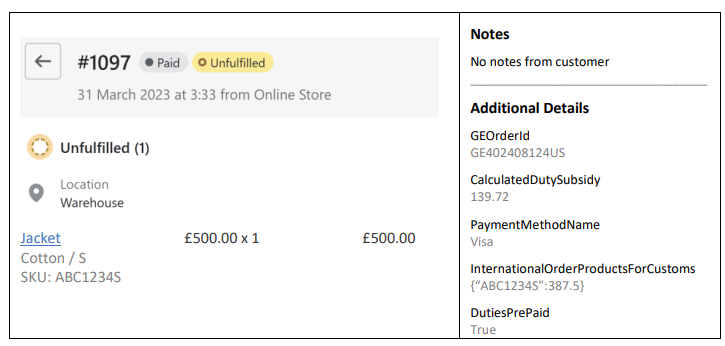 `CalculatedDutySubsidy` 139.72 USD includes duties, VAT, and CCF.
**Note**: the D\&T line items do not appear in the order details at all.
`CalculatedDutySubsidy` 139.72 USD includes duties, VAT, and CCF.
**Note**: the D\&T line items do not appear in the order details at all.
 **Conclusion**
* Duty, tax, and customs clearance fees (CCF) are all part of the overall duties and taxes calculation.
* When a customer’s checkout displays duty & tax-related fees, these costs appear as order line items.
* Any subsidized costs, whether both duties and taxes or just duty or just taxes – appear in the note attributes `CalculatedDutySubsidy` field.
### Shopify Order JSON example
A full example of an order JSON file can be downloaded here:[Shopify Order JSON example](https://globaleonline.sharepoint.com/sites/ExternalSharing/Shared%20Documents/Forms/AllItems.aspx?id=%2Fsites%2FExternalSharing%2FShared%20Documents%2FSolutions%2FPlatforms%2FShopify%20Native%20CrossBorder%20by%20Global%2De%2FExample%20JSON%2FExample%20Order%20%2D%20CR%20with%20additional%20fees%2Ejson\&parent=%2Fsites%2FExternalSharing%2FShared%20Documents%2FSolutions%2FPlatforms%2FShopify%20Native%20CrossBorder%20by%20Global%2De%2FExample%20JSON\&p=true\&ga=1).
## Accounting Perspective
From a Shopify view, orders are created per customer as a B2C transaction with Global-e. From an accounting perspective, orders should be treated as domestic B2B orders booked against a Global-e account.
You may book any order line items to calculate gross revenue while bearing in mind that in most scenarios Global-e is responsible for handling remittance and filing local VAT and other taxes.
For estimated net revenue, you can subtract the`CalculatedDutySubsidy` field. For actual revenue, refer to the Global-e financial [reconciliation report](/reports#reconciliation-report-275518).
## Global‑e to Shopify Order Updates
Global‑e updates Shopify when a customer places a new order, or when an order is fulfilled, cancelled, or refunded.
## Free Shipping on Orders
Select one of the following methods to create orders with a zero shipping fee:
**Method 1: Update the Shopify template**
1. Navigate to the **product-template.liquid** file in your Shopify theme.
2. within the **\{% form 'product' ... %}** block, insert the following code snippet adjusting the internal logic as needed for your implementation:
```
{% assign property='someValue' %}
```
3. Add the product to the cart to submit the form.
The property is now available on cart.js.
**Method 2: Update the cart via API**
Insert or update the cart with one of the following APIs:
**Insert**
```
curl -X POST \
https://{store_name}.myshopify.com/api/2024-10/graphql.json \
-H 'Content-Type: application/json' \
-H 'X-Shopify-Storefront-Access-Token: {storefront_access_token}' \
-d '{
"query": "mutation cartLinesAdd($cartId: ID!, $lines: [CartLineInput!]!) {
cartLinesAdd(cartId: $cartId, lines: $lines) {
cart {
# Cart fields
}
userErrors {
field
message
}
warnings {
# CartWarning fields
}
}
}",
"variables": {
"cartId": "gid://shopify/Cart/123",
"lines": [
{
"attributes": [
{
"key": "
**Conclusion**
* Duty, tax, and customs clearance fees (CCF) are all part of the overall duties and taxes calculation.
* When a customer’s checkout displays duty & tax-related fees, these costs appear as order line items.
* Any subsidized costs, whether both duties and taxes or just duty or just taxes – appear in the note attributes `CalculatedDutySubsidy` field.
### Shopify Order JSON example
A full example of an order JSON file can be downloaded here:[Shopify Order JSON example](https://globaleonline.sharepoint.com/sites/ExternalSharing/Shared%20Documents/Forms/AllItems.aspx?id=%2Fsites%2FExternalSharing%2FShared%20Documents%2FSolutions%2FPlatforms%2FShopify%20Native%20CrossBorder%20by%20Global%2De%2FExample%20JSON%2FExample%20Order%20%2D%20CR%20with%20additional%20fees%2Ejson\&parent=%2Fsites%2FExternalSharing%2FShared%20Documents%2FSolutions%2FPlatforms%2FShopify%20Native%20CrossBorder%20by%20Global%2De%2FExample%20JSON\&p=true\&ga=1).
## Accounting Perspective
From a Shopify view, orders are created per customer as a B2C transaction with Global-e. From an accounting perspective, orders should be treated as domestic B2B orders booked against a Global-e account.
You may book any order line items to calculate gross revenue while bearing in mind that in most scenarios Global-e is responsible for handling remittance and filing local VAT and other taxes.
For estimated net revenue, you can subtract the`CalculatedDutySubsidy` field. For actual revenue, refer to the Global-e financial [reconciliation report](/reports#reconciliation-report-275518).
## Global‑e to Shopify Order Updates
Global‑e updates Shopify when a customer places a new order, or when an order is fulfilled, cancelled, or refunded.
## Free Shipping on Orders
Select one of the following methods to create orders with a zero shipping fee:
**Method 1: Update the Shopify template**
1. Navigate to the **product-template.liquid** file in your Shopify theme.
2. within the **\{% form 'product' ... %}** block, insert the following code snippet adjusting the internal logic as needed for your implementation:
```
{% assign property='someValue' %}
```
3. Add the product to the cart to submit the form.
The property is now available on cart.js.
**Method 2: Update the cart via API**
Insert or update the cart with one of the following APIs:
**Insert**
```
curl -X POST \
https://{store_name}.myshopify.com/api/2024-10/graphql.json \
-H 'Content-Type: application/json' \
-H 'X-Shopify-Storefront-Access-Token: {storefront_access_token}' \
-d '{
"query": "mutation cartLinesAdd($cartId: ID!, $lines: [CartLineInput!]!) {
cartLinesAdd(cartId: $cartId, lines: $lines) {
cart {
# Cart fields
}
userErrors {
field
message
}
warnings {
# CartWarning fields
}
}
}",
"variables": {
"cartId": "gid://shopify/Cart/123",
"lines": [
{
"attributes": [
{
"key": "Provide customers with prepaid labels and refund them through the Global-e Merchant Platform. (For more information: [Issuing a Refund](/refunds-39855#issuing-a-refund-39855))
Provide customers with free returns instead of prepaid shipping labels. | To refund an order: 1. Go to the Shopify Admin screen.
 2. In the left navigation bar, click **Orders.**
The list of orders is displayed.
2. In the left navigation bar, click **Orders.**
The list of orders is displayed.
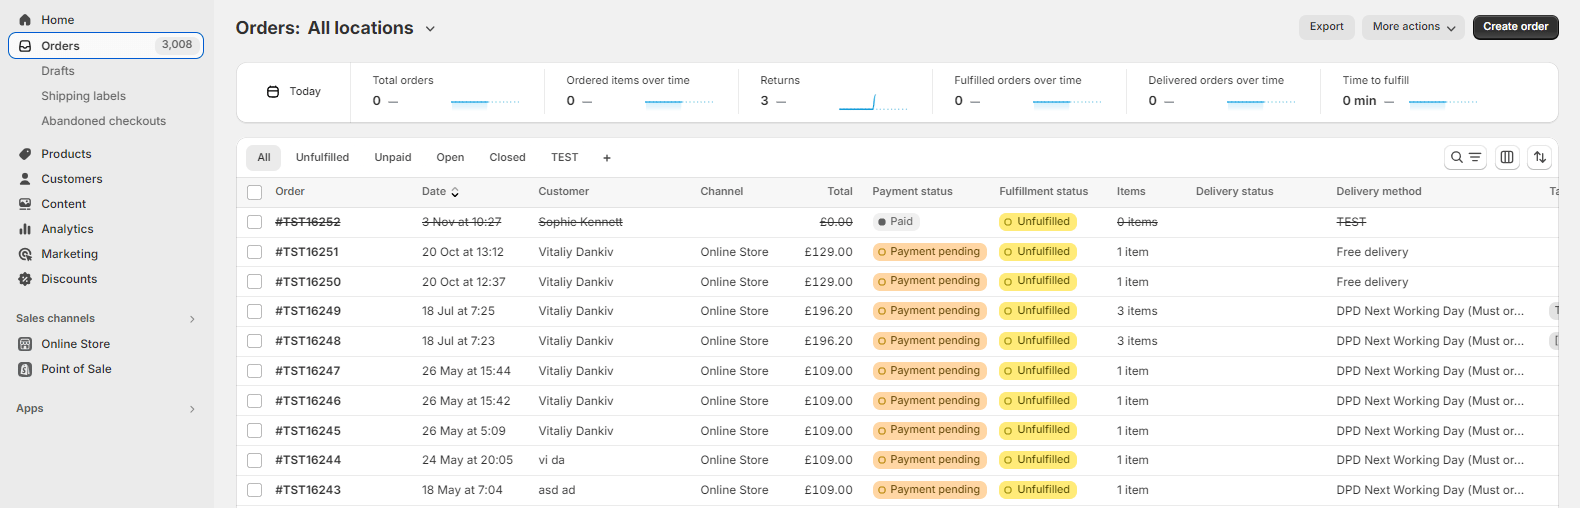 3. Select the order for which you want to perform a refund.
The order page opens.
3. Select the order for which you want to perform a refund.
The order page opens.
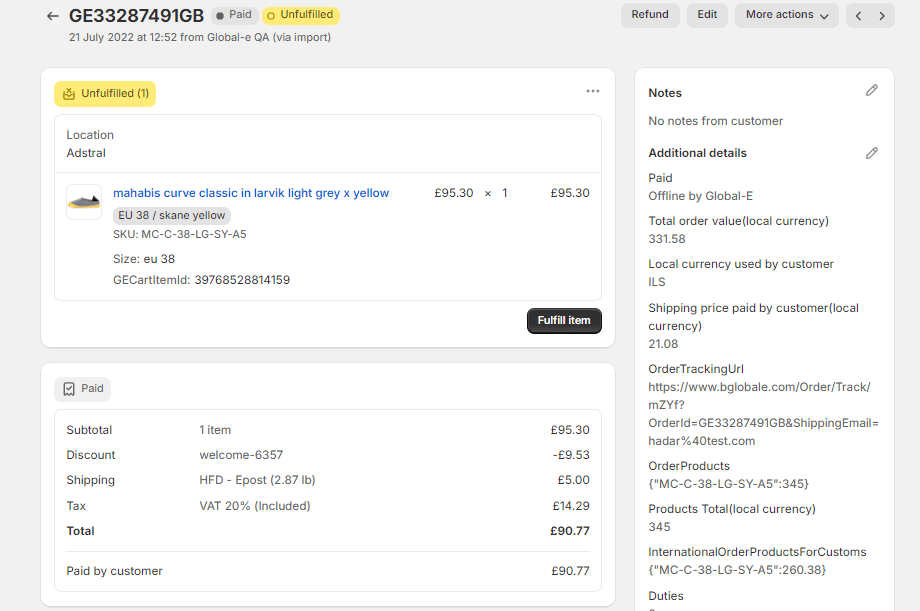 4. At the top-right of the page click **Refund**.
The Refund page opens.
4. At the top-right of the page click **Refund**.
The Refund page opens.
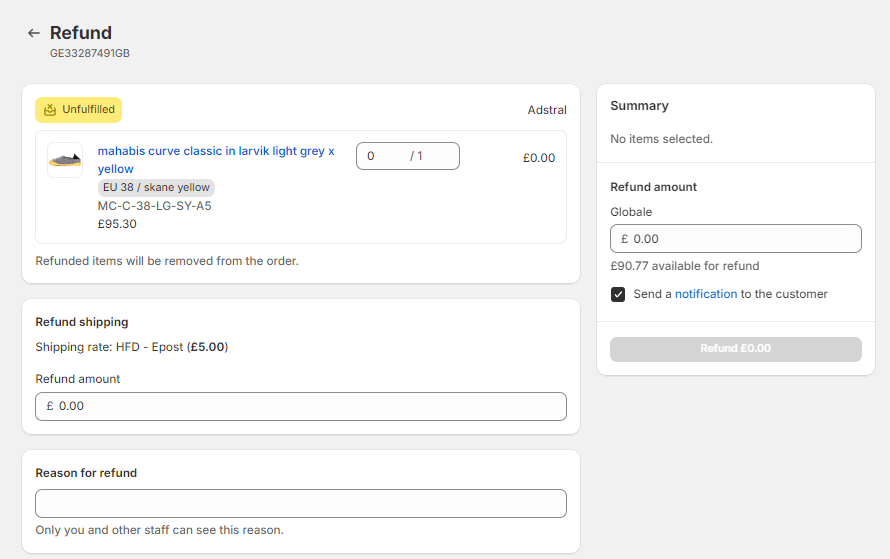 5. Enter the number of items that you want to refund.
If you don't want the item to be restocked, unselect the **Restock Item** option.
5. Enter the number of items that you want to refund.
If you don't want the item to be restocked, unselect the **Restock Item** option.
 The **Summary** section displays the refund amount.
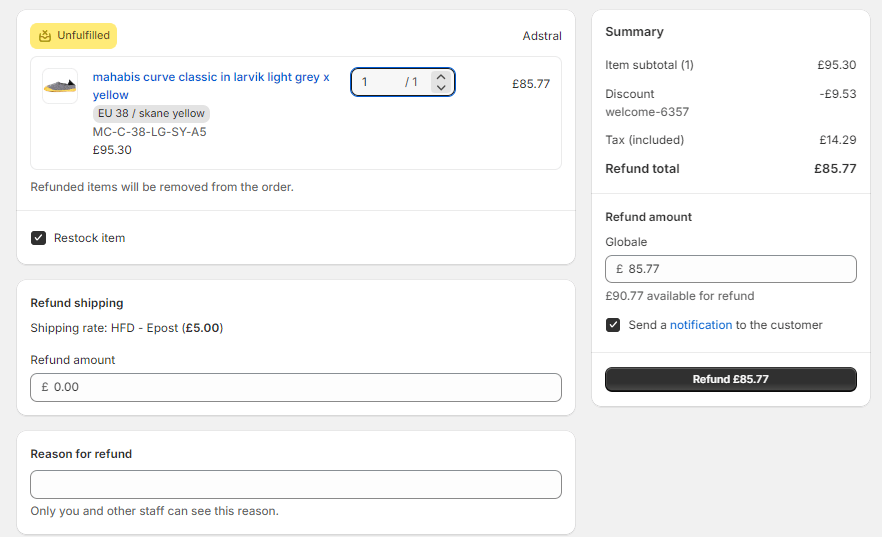 At the bottom of the page, you may include a reason for the refund.
6. Click **Refund \$(amount)** to finalize the refund.
The order is refunded and a refund notification email is sent to the customer.
## Cancel an Order
Before an order is fulfilled, the merchant can initiate an order cancellation from Shopify. Orders are canceled directly through the Shopify Admin.
At the bottom of the page, you may include a reason for the refund.
6. Click **Refund \$(amount)** to finalize the refund.
The order is refunded and a refund notification email is sent to the customer.
## Cancel an Order
Before an order is fulfilled, the merchant can initiate an order cancellation from Shopify. Orders are canceled directly through the Shopify Admin.
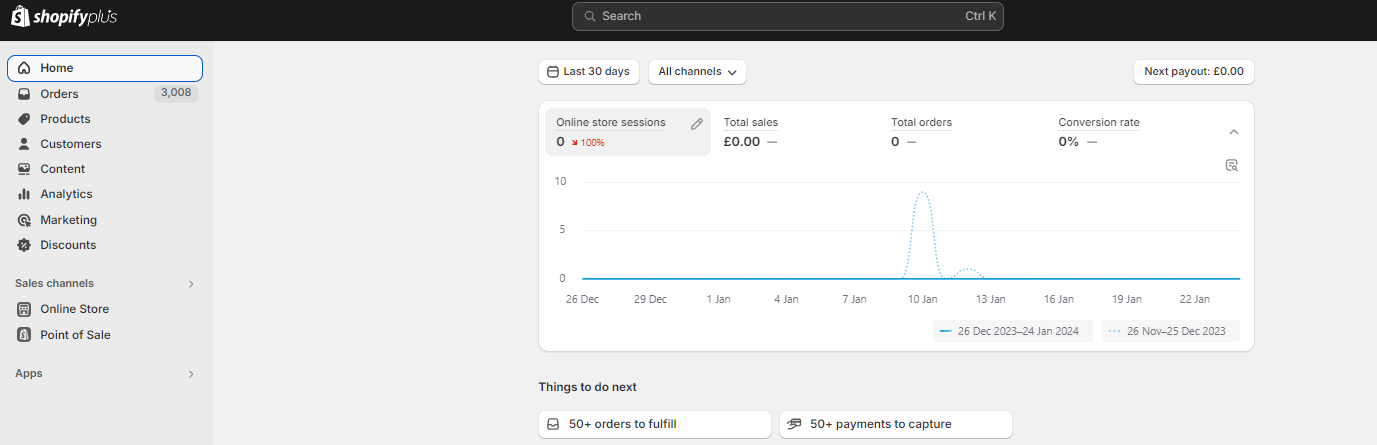 2. In the left navigation bar, click **Orders**.
The list of orders is displayed.
3. Select the order that you want to cancel.
The order page opens.
2. In the left navigation bar, click **Orders**.
The list of orders is displayed.
3. Select the order that you want to cancel.
The order page opens.
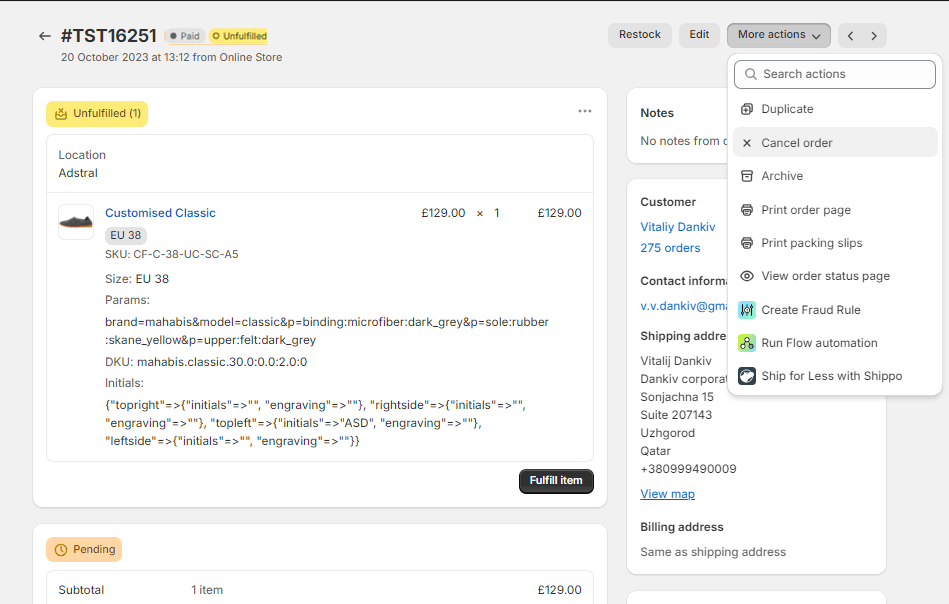
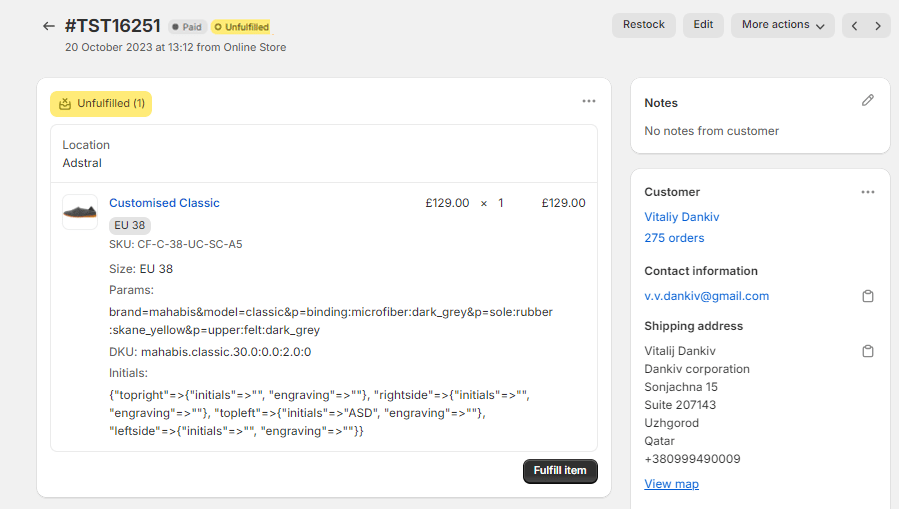 4. At the top-right, select **More actions** > **Cancel Order**.
 A confirmation window opens.
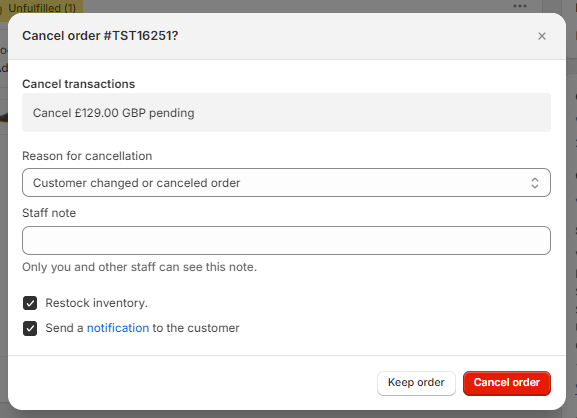 5. In the confirmation window, select a reason for the cancellation, and click **Cancel Order**.
If you do not wish to restock the inventory or have a notification sent to the customer, unselect those boxes.
The order is canceled and an email is automatically sent to the customer notifying them of the cancellation (unless you choose not to send a message).
## Amend an Order
Shopify can support amending orders before an order is fulfilled, for example, when an item is out of stock or needs to be cancelled, however it is performed using the Shopify **Refund**process. Therefore, to make changes to an order you need to follow the same instructions as for processing a refund in Shopify.
Note that although the Order Page menu does include an Edit option, you cannot use it to amend an order since the changes are not recognized by Global-e.
To amend an order:
1. Go to the Shopify Admin screen.
2. In the left navigation bar, click **Orders.**
The list of orders is displayed.
3. Select the order which you want to amend.
The order page opens.
4. At the top-right of the page click **Refund**.
The Refund page opens.
5. Enter the number of items to remove from the order.
If you don't want the item to be restocked, unselect the **Restock Item** option.
The **Summary** section displays the change.
At the bottom of the page, you may include a reason for the refund.
6. Click **Refund \$(amount)** to finalize the amendment.
The order is amended, and a notification email is sent to the customer.
## Draft Orders
### Overview
You can use the Draft Orders functionality to initiate an order directly from the Shopify admin:
* To [Placing a Draft Order](/global-e-orders-in-shopify#placing-a-draft-order)
* To [Influencer Orders](/global-e-orders-in-shopify#orders_for_influencers)
* To create Replacement Orders in Shopify. See [Replacements in Shopify](/global-e-orders-in-shopify#-271831-2).
### Placing a Draft Order
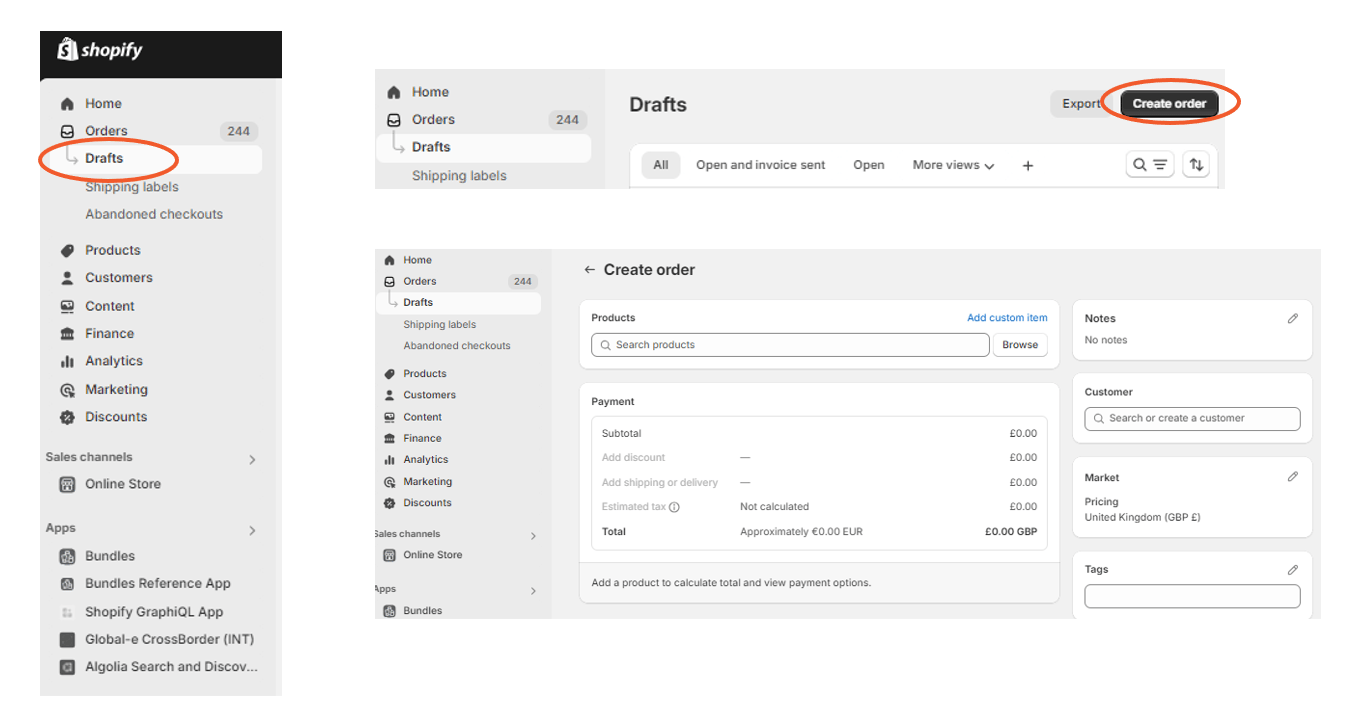
Place an order over the phone or by email on behalf of a customer and send them the payment link. Customers can also purchase products that are not yet available on the website. You can create draft orders in either the Order or Drafts screens
1. From your Shopify admin, navigate to **Orders**.
2. Click **Create order**.
The **Create order** screen is displayed:
5. In the confirmation window, select a reason for the cancellation, and click **Cancel Order**.
If you do not wish to restock the inventory or have a notification sent to the customer, unselect those boxes.
The order is canceled and an email is automatically sent to the customer notifying them of the cancellation (unless you choose not to send a message).
## Amend an Order
Shopify can support amending orders before an order is fulfilled, for example, when an item is out of stock or needs to be cancelled, however it is performed using the Shopify **Refund**process. Therefore, to make changes to an order you need to follow the same instructions as for processing a refund in Shopify.
Note that although the Order Page menu does include an Edit option, you cannot use it to amend an order since the changes are not recognized by Global-e.
To amend an order:
1. Go to the Shopify Admin screen.
2. In the left navigation bar, click **Orders.**
The list of orders is displayed.
3. Select the order which you want to amend.
The order page opens.
4. At the top-right of the page click **Refund**.
The Refund page opens.
5. Enter the number of items to remove from the order.
If you don't want the item to be restocked, unselect the **Restock Item** option.
The **Summary** section displays the change.
At the bottom of the page, you may include a reason for the refund.
6. Click **Refund \$(amount)** to finalize the amendment.
The order is amended, and a notification email is sent to the customer.
## Draft Orders
### Overview
You can use the Draft Orders functionality to initiate an order directly from the Shopify admin:
* To [Placing a Draft Order](/global-e-orders-in-shopify#placing-a-draft-order)
* To [Influencer Orders](/global-e-orders-in-shopify#orders_for_influencers)
* To create Replacement Orders in Shopify. See [Replacements in Shopify](/global-e-orders-in-shopify#-271831-2).
### Placing a Draft Order
Place an order over the phone or by email on behalf of a customer and send them the payment link. Customers can also purchase products that are not yet available on the website. You can create draft orders in either the Order or Drafts screens
1. From your Shopify admin, navigate to **Orders**.
2. Click **Create order**.
The **Create order** screen is displayed:
 3. Enter the following information:
1. Add products and quantities.
2. Set one of the following:
* Add a customer in the Customer section.
All the customer information is populated and the Market reflects the customer's country and currency.
* Change the destination country of the order:
1. Edit ( Edit\_\_\_Shopify.png) the Market section.
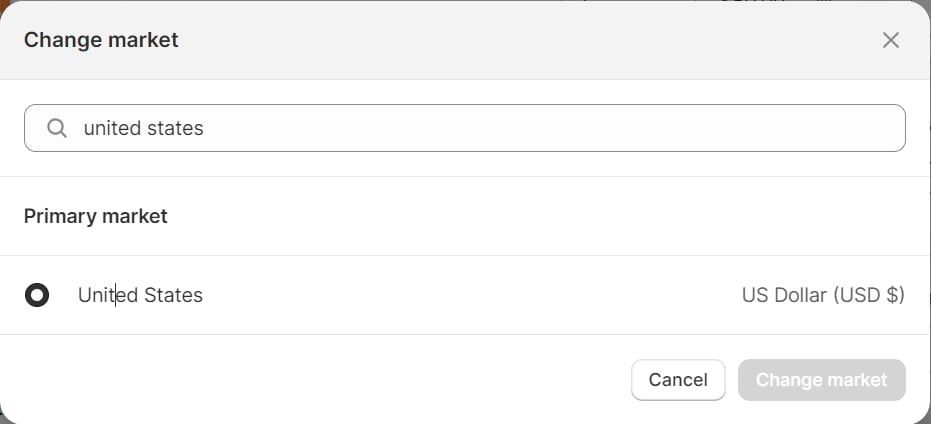
2. In the pop-up, select the destination country for the order and click **Change market**, as shown in the following example:
3. Enter the following information:
1. Add products and quantities.
2. Set one of the following:
* Add a customer in the Customer section.
All the customer information is populated and the Market reflects the customer's country and currency.
* Change the destination country of the order:
1. Edit ( Edit\_\_\_Shopify.png) the Market section.
2. In the pop-up, select the destination country for the order and click **Change market**, as shown in the following example:
 4. Do the following:
1. Click **Send invoice**.
4. Do the following:
1. Click **Send invoice**.
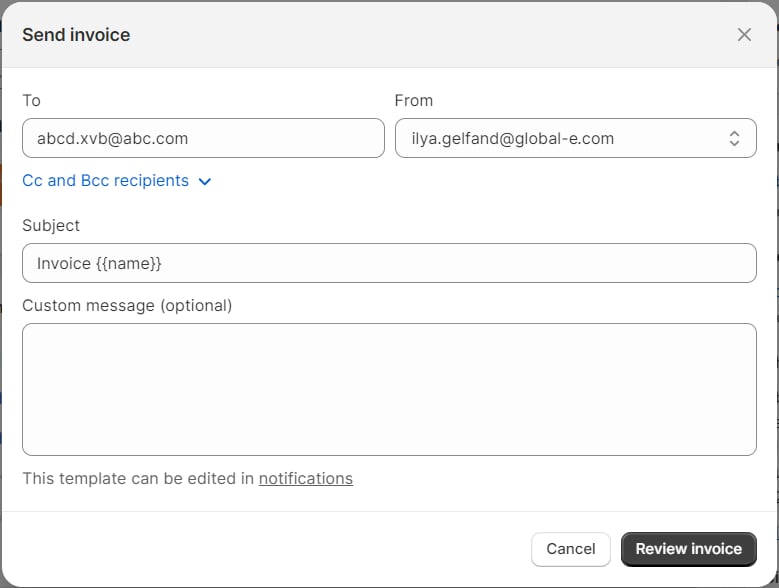 In the pop-up, if you added the Customer (in step 2), the customer's e-mail address is pre-populated. Otherwise, add the email address manually and enter the required information.
2. Click **Review Invoice**.
In the pop-up, if you added the Customer (in step 2), the customer's e-mail address is pre-populated. Otherwise, add the email address manually and enter the required information.
2. Click **Review Invoice**.
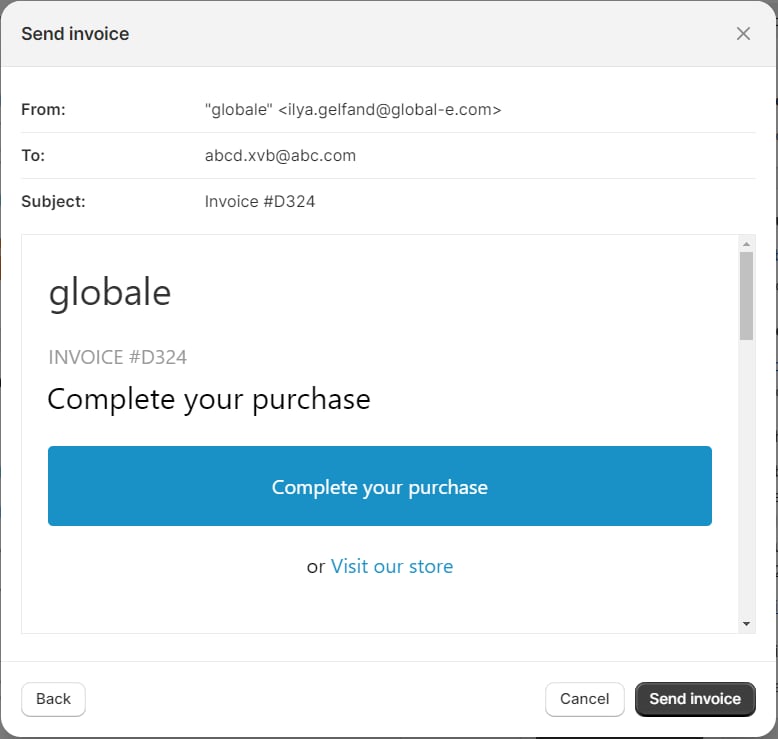 3. Click**Send Invoice** again.
 2. At the top-right click **Create Order**.
The **Create Order** page opens.
2. At the top-right click **Create Order**.
The **Create Order** page opens.
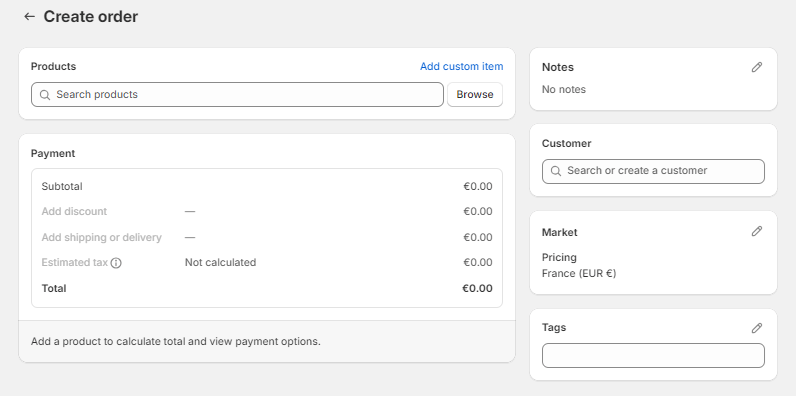 2. **Add customer details**
1. In the **Customer** section, click the search bar to view a list of your customers.
2. **Add customer details**
1. In the **Customer** section, click the search bar to view a list of your customers.
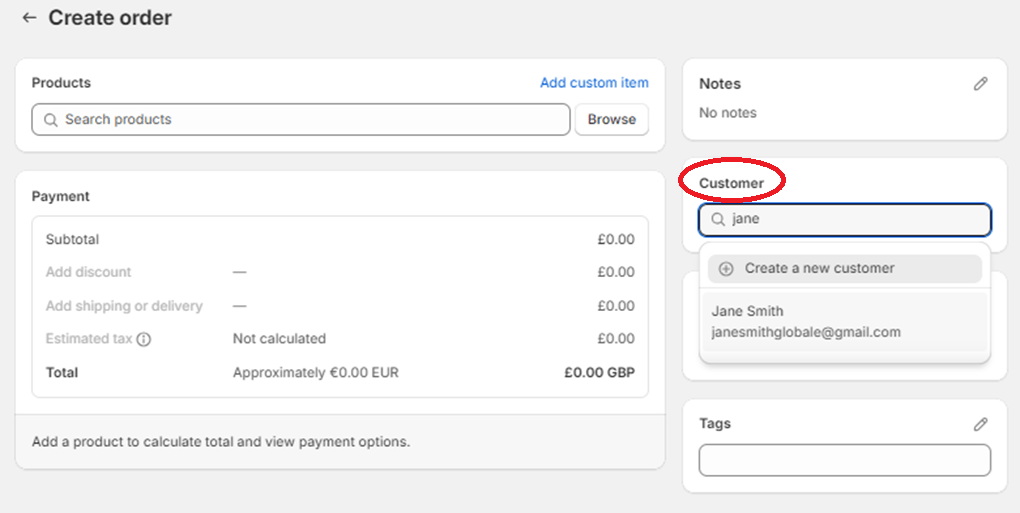 2. Select the name of the customer/influencer.
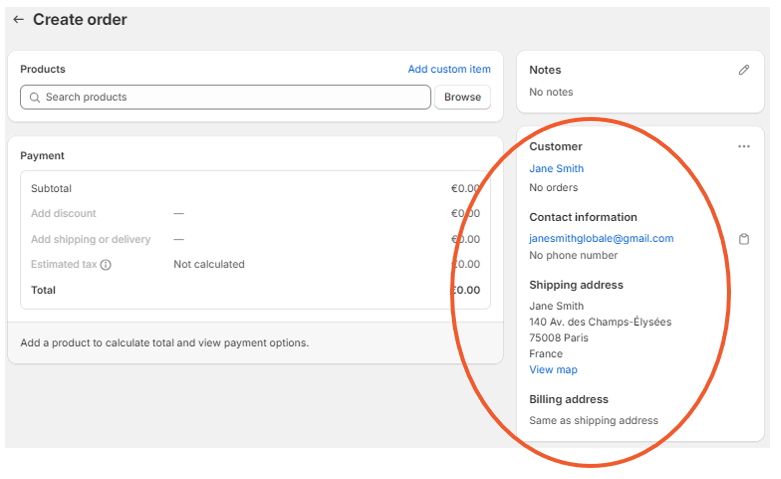 The customer details are displayed on the right.
3. **Add products**
1. Next to the **Products** search bar click **Browse**.
The customer details are displayed on the right.
3. **Add products**
1. Next to the **Products** search bar click **Browse**.
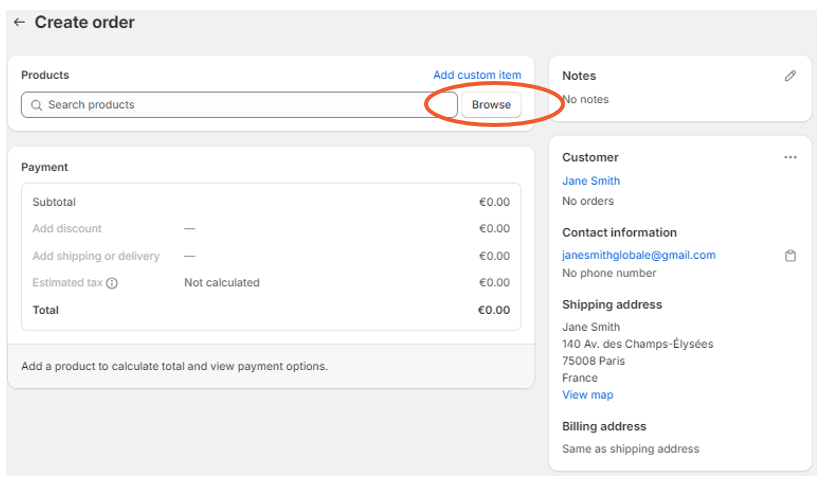 A window opens with a list of your products.
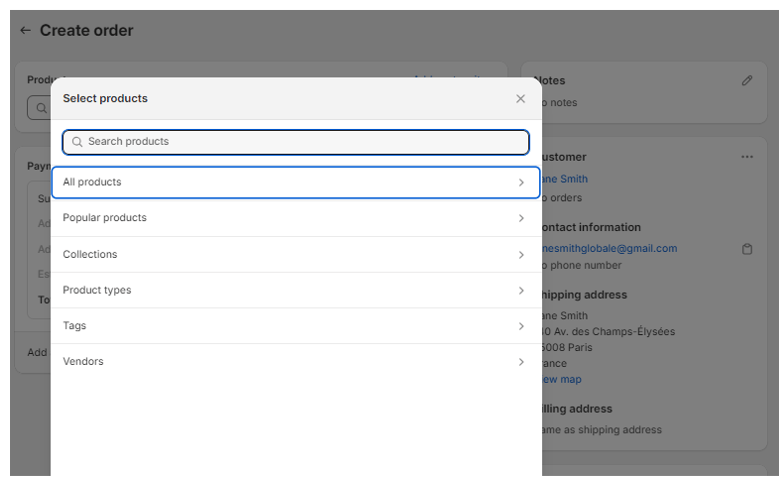 2. Select the desired product/s and click **Add**.
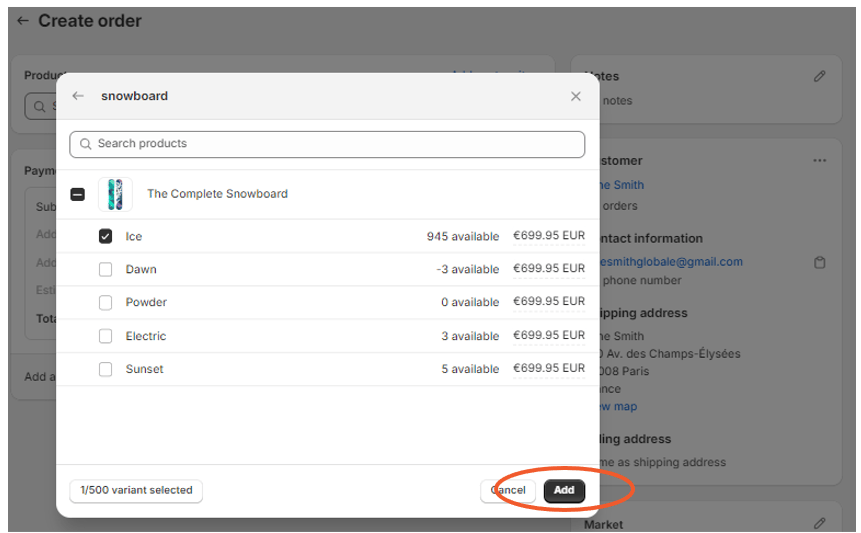 The products are added to the order.
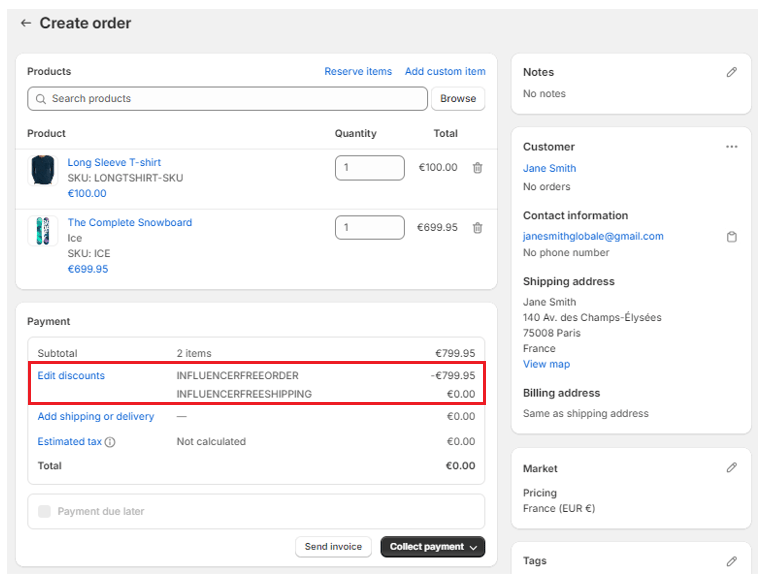
4. **Add the discount**
1. In the **Payment** section click **Add discount**.
The products are added to the order.
4. **Add the discount**
1. In the **Payment** section click **Add discount**.
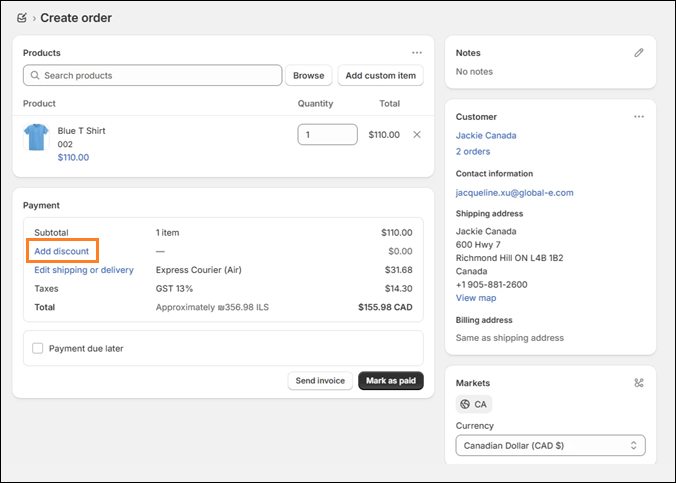 The **Add Discount** window opens displaying a list of available discount codes.
2. Select two discount codes, one for the order and the other for the shipping, and click **Apply**.
The **Add Discount** window opens displaying a list of available discount codes.
2. Select two discount codes, one for the order and the other for the shipping, and click **Apply**.
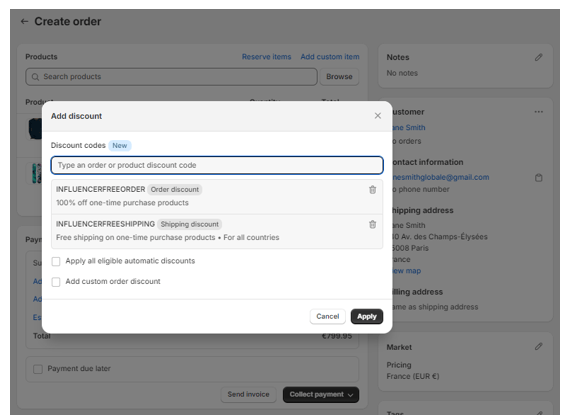 Both discount codes are applied to the order.
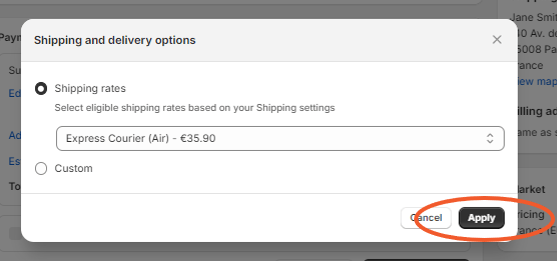
 5. **Add the shipping method**
1. Click on **Add Shipping or delivery**.
The **Shipping and delivery options** window opens.
2. Click on the **Shipping rates** drop-down menu and select the desired shipping option.
3. Click **Apply**.
5. **Add the shipping method**
1. Click on **Add Shipping or delivery**.
The **Shipping and delivery options** window opens.
2. Click on the **Shipping rates** drop-down menu and select the desired shipping option.
3. Click **Apply**.
 6. **Create the order**
1. At the bottom of the order screen click **Collect Payment** > **Mark as Paid**.
6. **Create the order**
1. At the bottom of the order screen click **Collect Payment** > **Mark as Paid**.
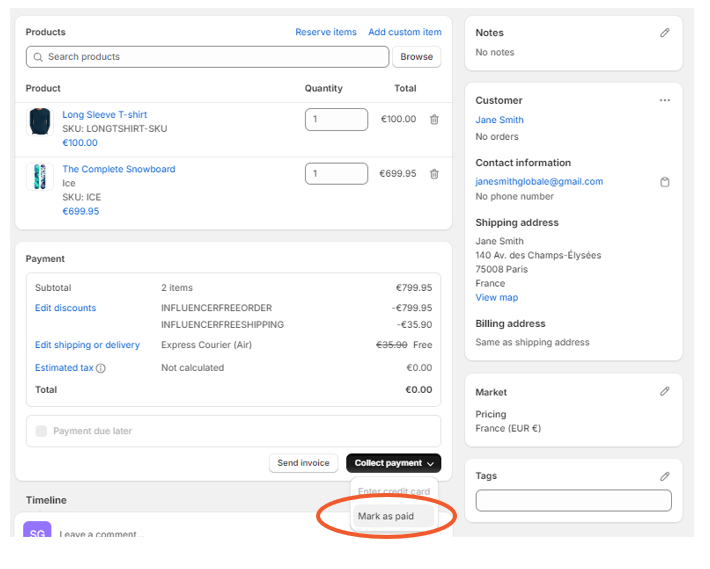 The **Mark as Paid** window opens, confirming the creation of a free order.
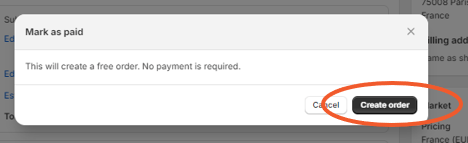 2. Click **Create Order.**
The order is finalized and can be viewed with the rest of your orders. This order can be processed in the exact same way as the other standard Global-e orders. This order can be processed in the exact same way as the other standard Global-e orders.
2. Click **Create Order.**
The order is finalized and can be viewed with the rest of your orders. This order can be processed in the exact same way as the other standard Global-e orders. This order can be processed in the exact same way as the other standard Global-e orders.
 ## Shopify's Multi-Currency
Shopify's multi-currency feature enables customers to view prices in their local currency, make payments in their currency at checkout, and receive refunds in the same currency.
Shopify's multi-currency orders include both the storefront base currency (usually USD) and the customer currency (€, £, ¥, and more).
These currency values are stored as different fields in Shopify:
* **Shop\_money** – This field holds the storefront's base currency, which serves as the main currency for the Shopify store and is used for reporting and analytics. It is typically mapped downstream by order management systems (OMS) and accounting systems.
* **Presentment\_money** - This field stores the customer currency, visible to international customers in the storefront, cart, checkout, and transactional emails.
### FX Conversion and Shopify API
Since Shopify’s multi-currency orders are created as the localised customer currency (*presentment\_money*), Shopify converts the values using FX conversion to get the *shop\_money* in the Shopify Admin and APIs.
Shopify uses different rounding calculation functions for the *shop\_money* value in the Transaction API and Order API:
* **Order API** - This API retrieves the breakdown cost of individual line items in both *shop\_money* and *presentment\_money*. The total amount is calculated as the sum of these individual line items.
* **Transaction API** - This API retrieves the total transacted amount in either *shop\_money* or *presentment\_money*.
### FX Rounding Discrepancy
### Introduction
This document explores the FX considerations related to Shopify's API and order total calculations.
When importing orders from Shopify into a third-party system, you can retrieve the order total:
* Directly from Shopify’s **Transaction API**
* OR -
* By re-calculating all order line items (via the **Order API**)
Mathematically, the order total from these two APIs would match without FX rounding. However, due to rounding, a decimal discrepancy may occur, as shown in the [Rounding Discrepancy Example](/global-e-orders-in-shopify#rounding-discrepancy-example). This has been verified by Shopify as expected behaviour; it applies to all multi-currency orders and it is not specific to Global‑e.
For more info on Shopify multi-currency and API, see [Shopify's Multi-Currency](/global-e-orders-in-shopify#shopify-s-multi-currency).
### Rounding Discrepancy Example
A customer places an order in Canada that costs \$395.50 CAD.
## Shopify's Multi-Currency
Shopify's multi-currency feature enables customers to view prices in their local currency, make payments in their currency at checkout, and receive refunds in the same currency.
Shopify's multi-currency orders include both the storefront base currency (usually USD) and the customer currency (€, £, ¥, and more).
These currency values are stored as different fields in Shopify:
* **Shop\_money** – This field holds the storefront's base currency, which serves as the main currency for the Shopify store and is used for reporting and analytics. It is typically mapped downstream by order management systems (OMS) and accounting systems.
* **Presentment\_money** - This field stores the customer currency, visible to international customers in the storefront, cart, checkout, and transactional emails.
### FX Conversion and Shopify API
Since Shopify’s multi-currency orders are created as the localised customer currency (*presentment\_money*), Shopify converts the values using FX conversion to get the *shop\_money* in the Shopify Admin and APIs.
Shopify uses different rounding calculation functions for the *shop\_money* value in the Transaction API and Order API:
* **Order API** - This API retrieves the breakdown cost of individual line items in both *shop\_money* and *presentment\_money*. The total amount is calculated as the sum of these individual line items.
* **Transaction API** - This API retrieves the total transacted amount in either *shop\_money* or *presentment\_money*.
### FX Rounding Discrepancy
### Introduction
This document explores the FX considerations related to Shopify's API and order total calculations.
When importing orders from Shopify into a third-party system, you can retrieve the order total:
* Directly from Shopify’s **Transaction API**
* OR -
* By re-calculating all order line items (via the **Order API**)
Mathematically, the order total from these two APIs would match without FX rounding. However, due to rounding, a decimal discrepancy may occur, as shown in the [Rounding Discrepancy Example](/global-e-orders-in-shopify#rounding-discrepancy-example). This has been verified by Shopify as expected behaviour; it applies to all multi-currency orders and it is not specific to Global‑e.
For more info on Shopify multi-currency and API, see [Shopify's Multi-Currency](/global-e-orders-in-shopify#shopify-s-multi-currency).
### Rounding Discrepancy Example
A customer places an order in Canada that costs \$395.50 CAD.
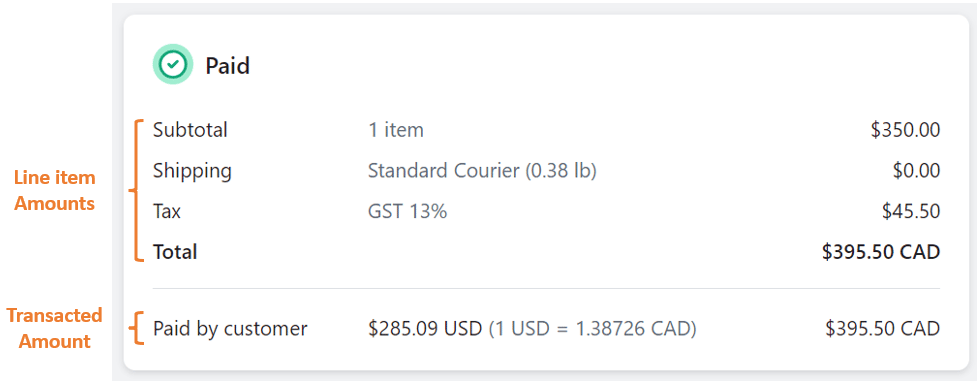 The Order API provide the item cost, the shipping cost, the tax, and the sum of all these values.
The Transaction API provides the transacted amount from the customer.
The Order API provide the item cost, the shipping cost, the tax, and the sum of all these values.
The Transaction API provides the transacted amount from the customer.
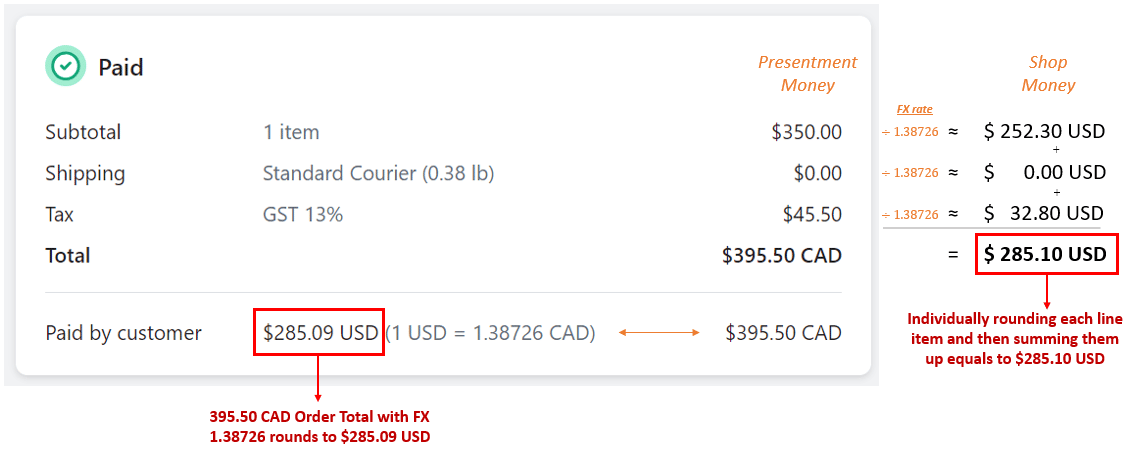 With the FX rate at 1.38726, there is a \$0.01 difference between the sum of individual line item prices and the total transacted amount. This discrepancy arises due to rounding when comparing the order component FX conversions and the FX conversion of the total itself, leading to a normal and expected mismatch when rounded to two decimal places.
| | Presentment\_money | Shop\_money | Calculation |
| --------------- | --------------------------------------------------------------------- | --------------------------------------------------------------------------- | --------------------------------- |
| Order API | Line Item 1 = 350.00 CADTaxes = 45.50 CADTotal price = **395.50 CAD** | Line Item 1 = $252.30 USDTaxes = $ 32.80 USDTotal price = **\$285.10 USD** | 252.30 USD+ 32.80 USD= 285.10 USD |
| Transaction API | Total Amount= **395.50 CAD** | Total Amount= **\$285.09 USD** | 395.50 CAD / 1.38726= 258.09 USD |
This behaviour applies to all Shopify multi-currency orders. Shopify has confirmed that this is not a bug and no API changes will be made.
### Conclusion
No mandatory actions are needed. If you are using both the Transaction API and the Order API to get the order total, anticipate that the totals will not match exactly for Shopify multi-currency orders.
## Replacements in Shopify
### Overview
Global-e‑ supports product replacements directly through the Shopify Admin.
### Prerequisites
Update the **Global-e Crossborder** application.
1. Navigate to the Global-e CrossBorder App
* INT (integration): [https://admin.shopify.com/store/\{\{shopify-store}}/apps/global-e-crossborder-int](https://admin.shopify.com/store/\{\{shopify-store}}/apps/global-e-crossborder-int)
* PROD (Production): [https://admin.shopify.com/store/\{\{shopify-store}}/apps/global-e-crossborder](https://admin.shopify.com/store/\{\{shopify-store}}/apps/global-e-crossborder)
2. Go to Settings > **Update Global-e Scopes**.
With the FX rate at 1.38726, there is a \$0.01 difference between the sum of individual line item prices and the total transacted amount. This discrepancy arises due to rounding when comparing the order component FX conversions and the FX conversion of the total itself, leading to a normal and expected mismatch when rounded to two decimal places.
| | Presentment\_money | Shop\_money | Calculation |
| --------------- | --------------------------------------------------------------------- | --------------------------------------------------------------------------- | --------------------------------- |
| Order API | Line Item 1 = 350.00 CADTaxes = 45.50 CADTotal price = **395.50 CAD** | Line Item 1 = $252.30 USDTaxes = $ 32.80 USDTotal price = **\$285.10 USD** | 252.30 USD+ 32.80 USD= 285.10 USD |
| Transaction API | Total Amount= **395.50 CAD** | Total Amount= **\$285.09 USD** | 395.50 CAD / 1.38726= 258.09 USD |
This behaviour applies to all Shopify multi-currency orders. Shopify has confirmed that this is not a bug and no API changes will be made.
### Conclusion
No mandatory actions are needed. If you are using both the Transaction API and the Order API to get the order total, anticipate that the totals will not match exactly for Shopify multi-currency orders.
## Replacements in Shopify
### Overview
Global-e‑ supports product replacements directly through the Shopify Admin.
### Prerequisites
Update the **Global-e Crossborder** application.
1. Navigate to the Global-e CrossBorder App
* INT (integration): [https://admin.shopify.com/store/\{\{shopify-store}}/apps/global-e-crossborder-int](https://admin.shopify.com/store/\{\{shopify-store}}/apps/global-e-crossborder-int)
* PROD (Production): [https://admin.shopify.com/store/\{\{shopify-store}}/apps/global-e-crossborder](https://admin.shopify.com/store/\{\{shopify-store}}/apps/global-e-crossborder)
2. Go to Settings > **Update Global-e Scopes**.
 3. Click **Update Access Scope**.
The **Update** page opens.
3. Click **Update Access Scope**.
The **Update** page opens.
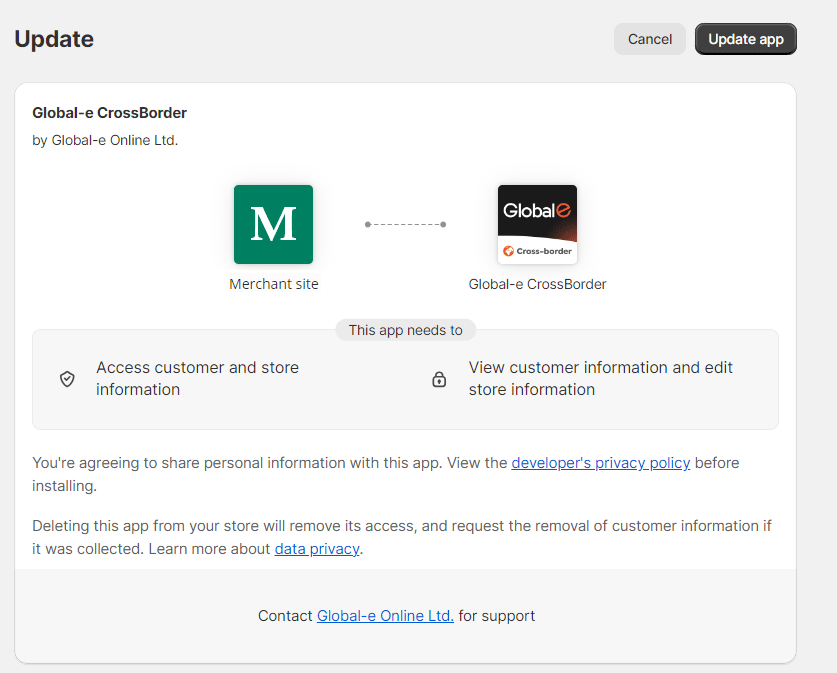 4. Click **Update App.**
5. Wait 10-15 minutes for the application to update before starting to create Shopify replacements.
A message under the **Update Access Scope** button confirms that the app has been successfully updated.
4. Click **Update App.**
5. Wait 10-15 minutes for the application to update before starting to create Shopify replacements.
A message under the **Update Access Scope** button confirms that the app has been successfully updated.
 2. In the left navigation bar, click **Orders**.
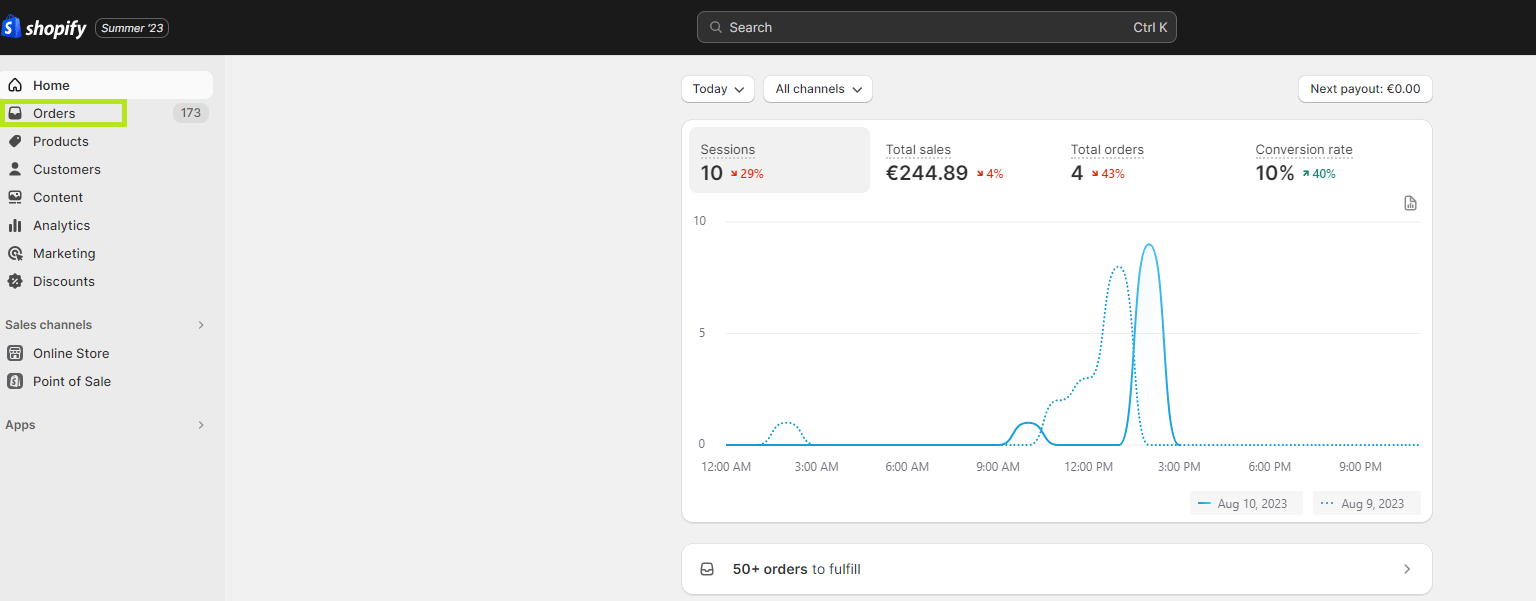 The list of orders is displayed. See Step 3, below.
3. Select the order that you want to replace.
The list of orders is displayed. See Step 3, below.
3. Select the order that you want to replace.
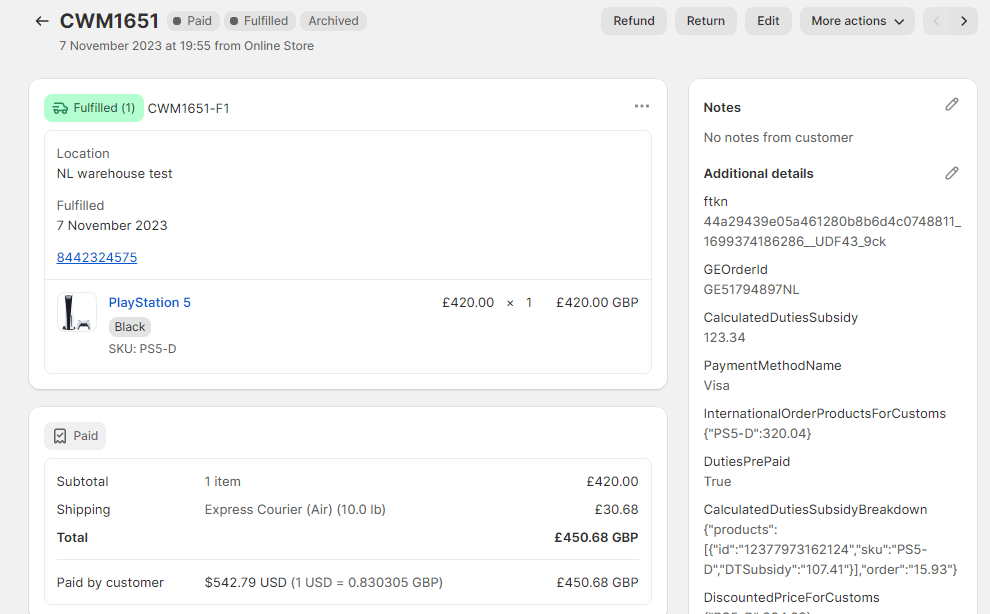
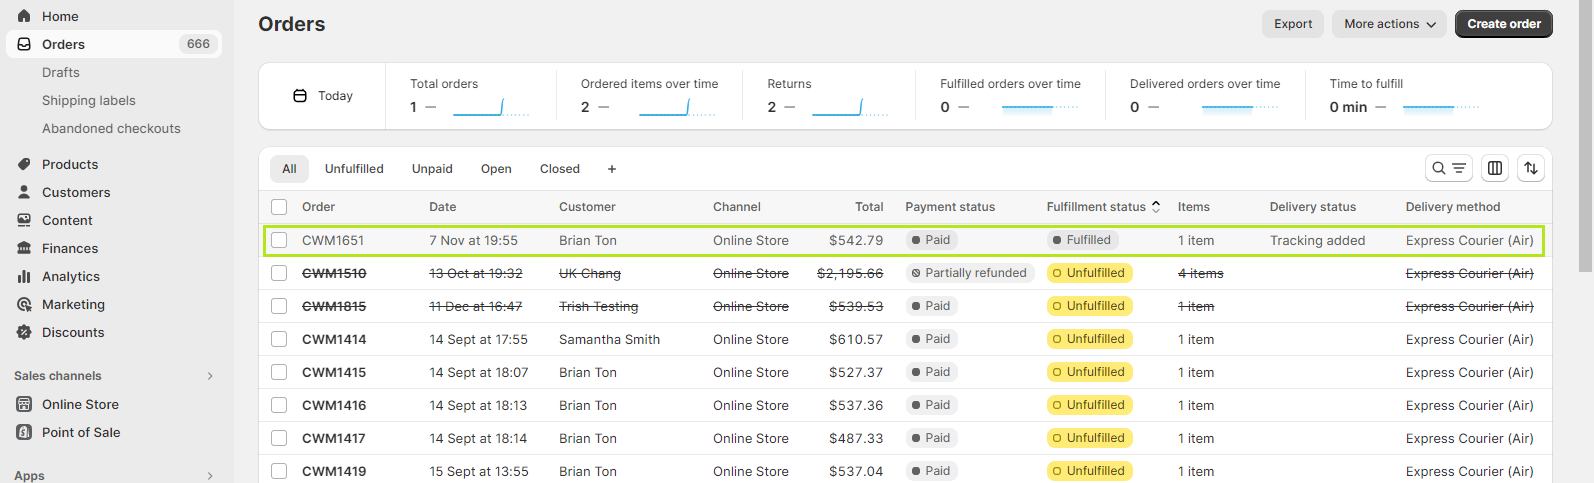 The original order opens.
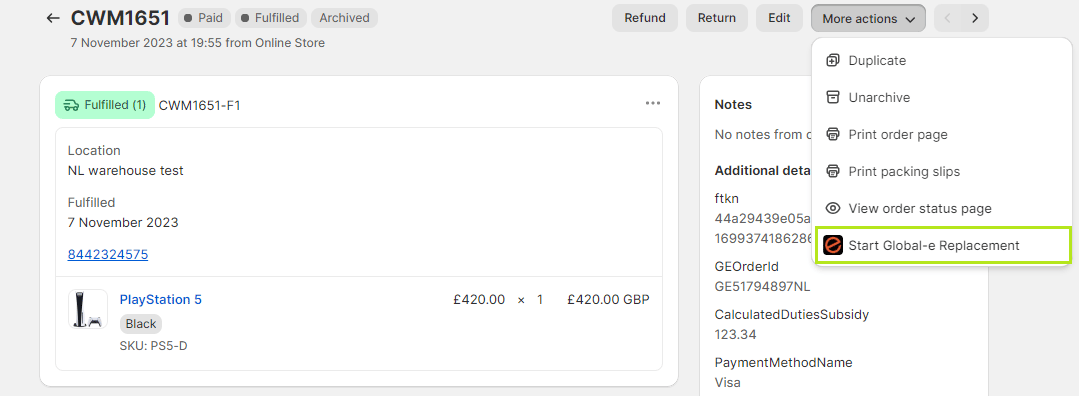
 4. At the top-right, select **More actions > Start Global‑e Replacement.**
 An instruction page opens, explaining the process for replacing an order.
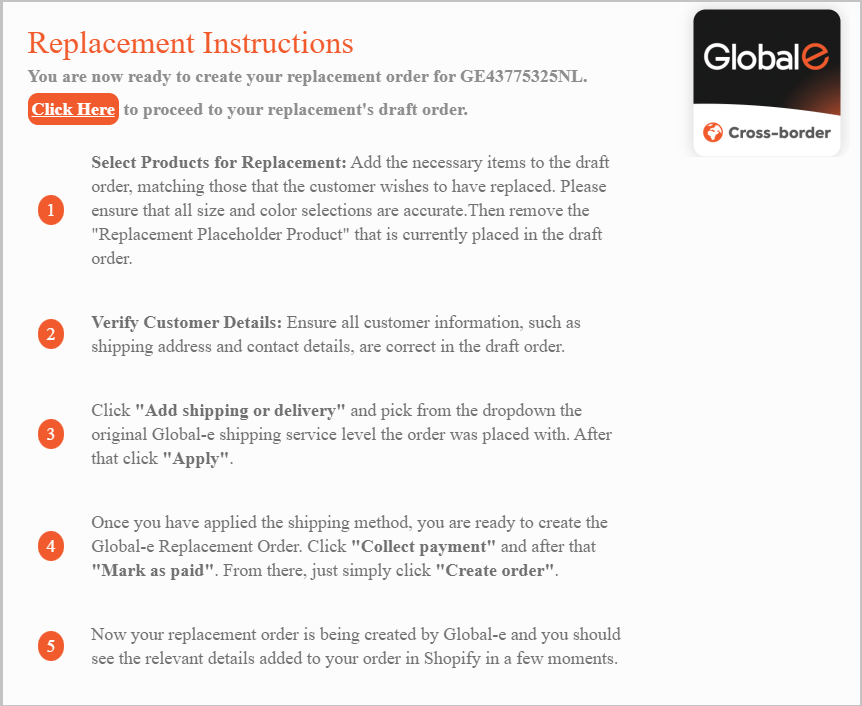 5. At the top of the Replacement Instructions page, select **Click Here**.
The draft order opens.
5. At the top of the Replacement Instructions page, select **Click Here**.
The draft order opens.

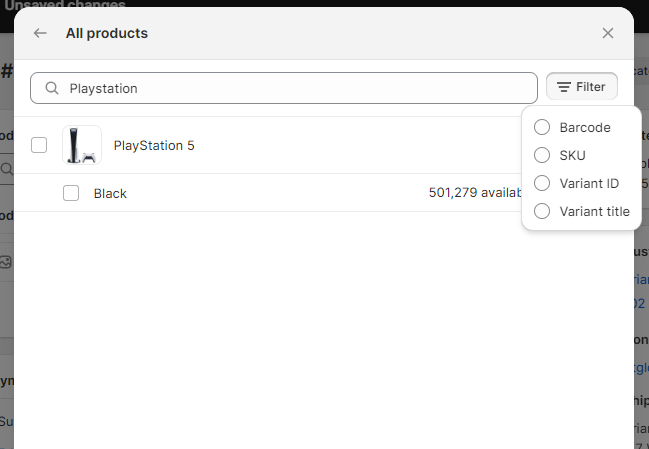
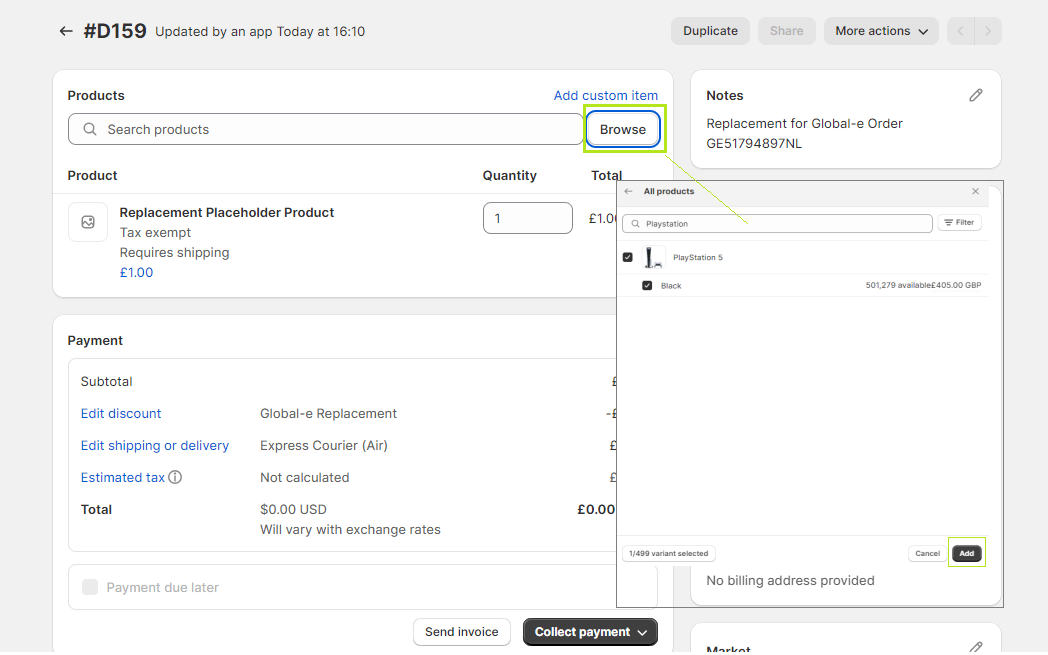 You can use the filter to search for a product by a barcode, SKU, ID, or title.
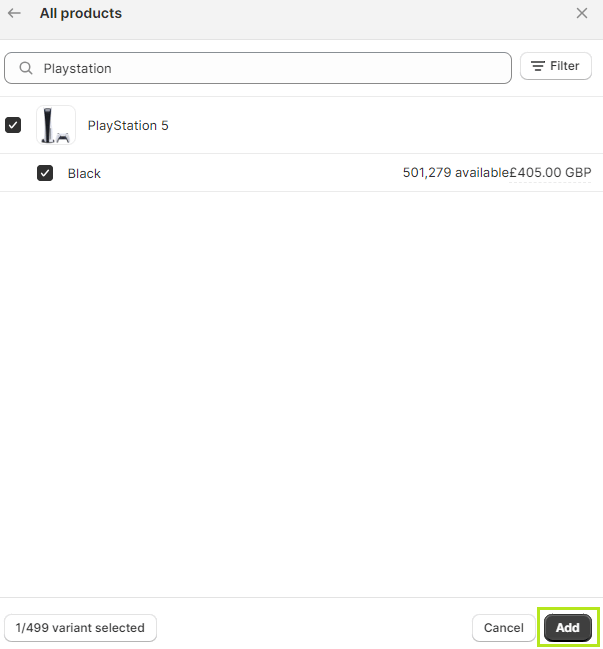
 7. Select one or more replacement products and at the bottom-right click **Add**.
 The product/s are added to the draft order.
The order screen displays:
* The placeholder product
* The replacement product
The product/s are added to the draft order.
The order screen displays:
* The placeholder product
* The replacement product
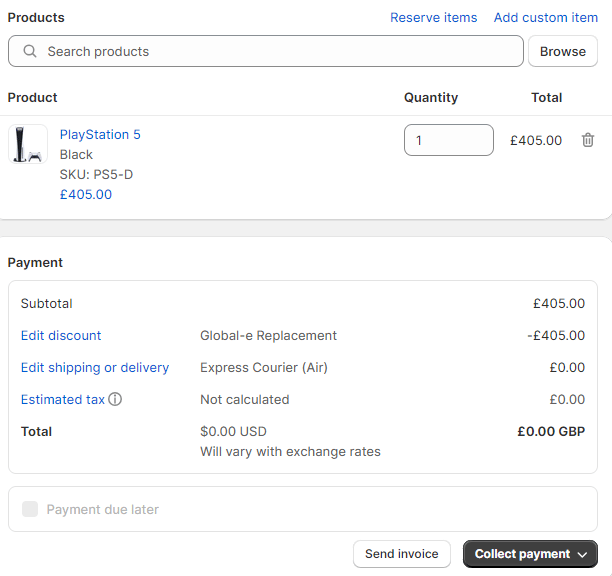
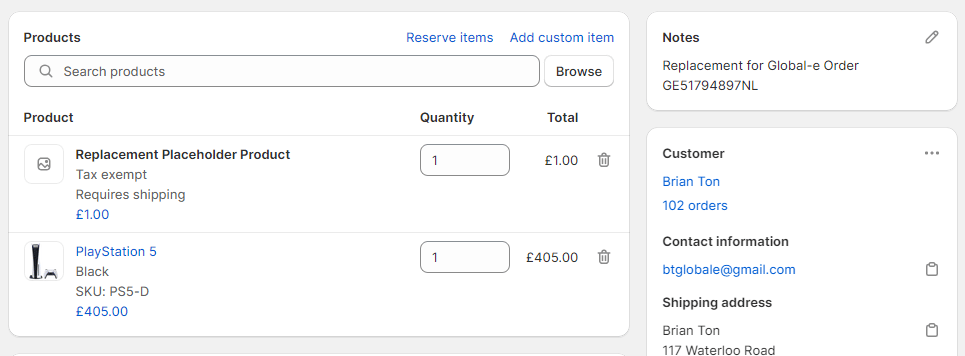 8. Click the **Trash** icon to delete the placeholder product.
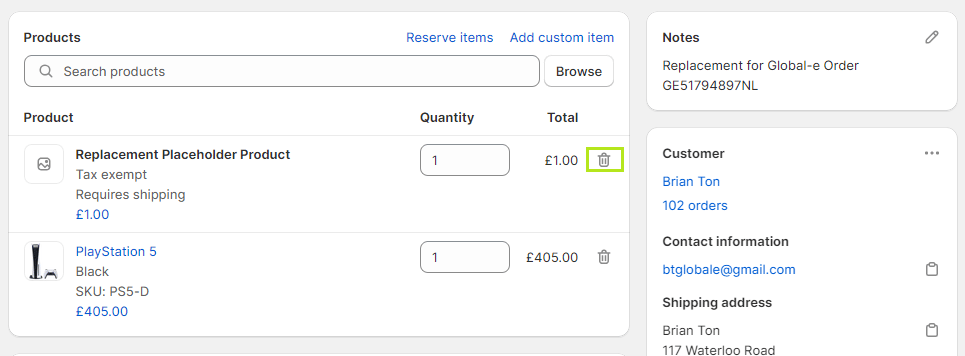 Now, the draft order only includes the replacement product.
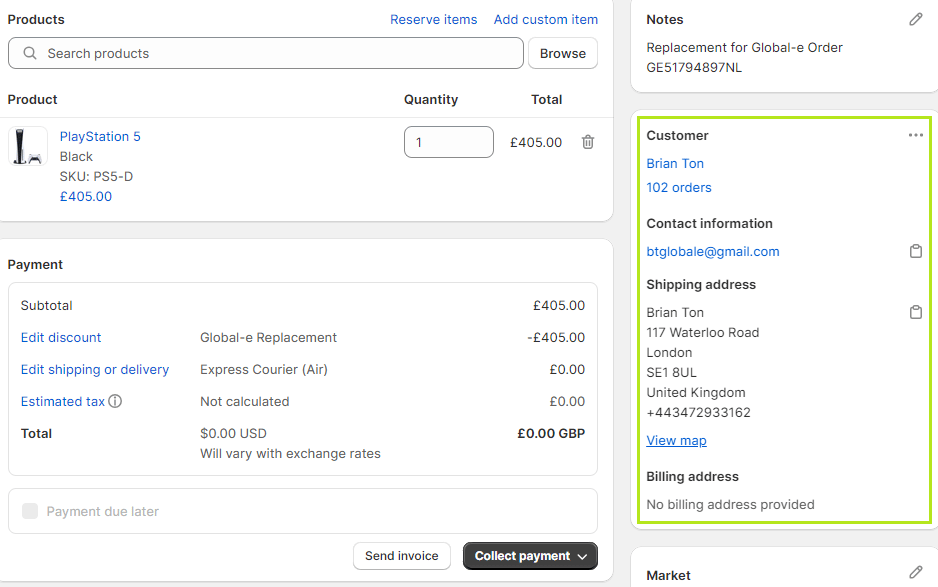
 9. On the right side of the draft order, ensure the customer's shipping address and contact details are correct.
 10. At the bottom of the **Payment** section, select **Collect payment** > **Mark as paid**
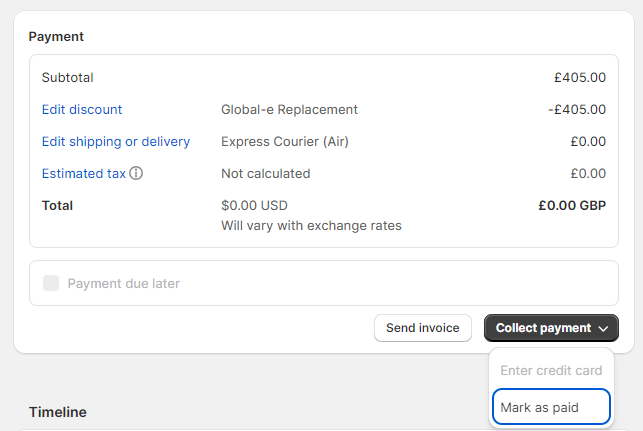 A pop-up appears confirming that an order is created and no payment is required.

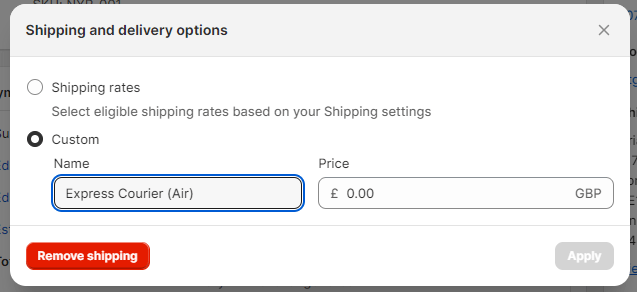 2. Select **Shipping rates**.
3. Choose a shipping method and click **Apply**.
2. Select **Shipping rates**.
3. Choose a shipping method and click **Apply**.
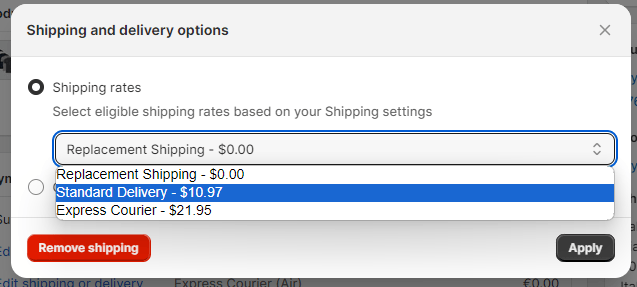 The new shipping rate is added to the order total.
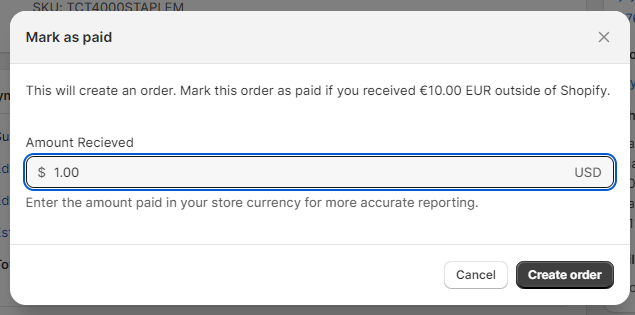
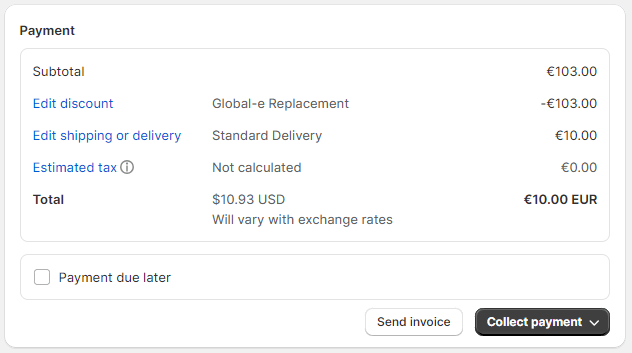 4. Click **Collect payment** > **Mark as paid**.
The **Mark as paid** window opens.
5. Input a shipping rate of \$1.00 (or more) and click **Create order**.
4. Click **Collect payment** > **Mark as paid**.
The **Mark as paid** window opens.
5. Input a shipping rate of \$1.00 (or more) and click **Create order**.
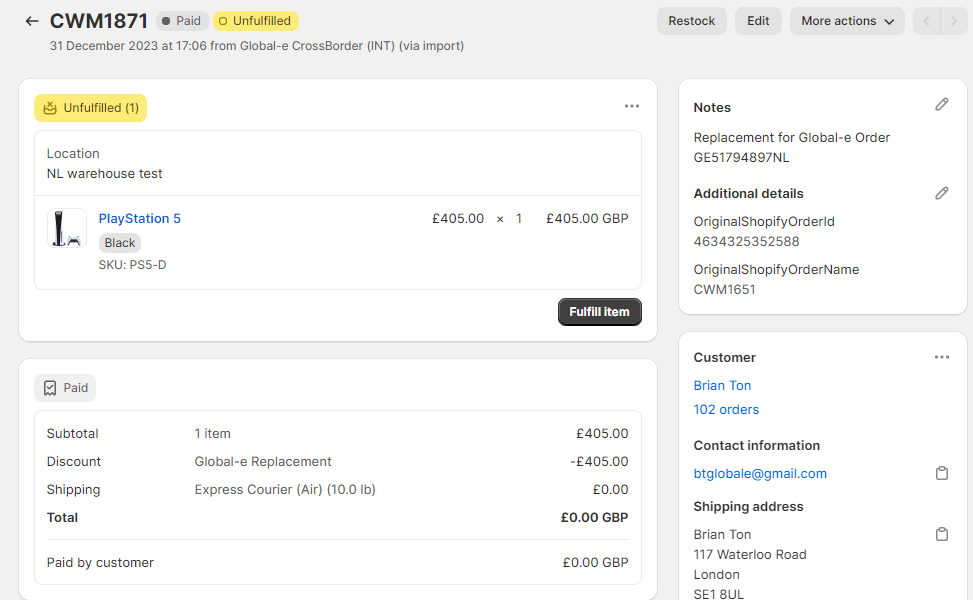
 A new order for the replacement item (Replacement order) is created.
11. In the pop-up, click **Create Order.**
A new order for the replacement item (Replacement order) is created.
A new order for the replacement item (Replacement order) is created.
11. In the pop-up, click **Create Order.**
A new order for the replacement item (Replacement order) is created.
 12. On the Global‑e Merchant Portal, view the Replacement order.
a. From the Global‑e Merchant Portal, go to **Orders > View Orders**.
b. Open the original order.
12. On the Global‑e Merchant Portal, view the Replacement order.
a. From the Global‑e Merchant Portal, go to **Orders > View Orders**.
b. Open the original order.
 The newly replaced order is added to your ecommerce platform as a new order.
At the top of the order screen, the newly replaced order is flagged as a replacement order.
The newly replaced order is added to your ecommerce platform as a new order.
At the top of the order screen, the newly replaced order is flagged as a replacement order.
 If you do not wish to include replacement orders in your sales reports, you may need to perform modifications on your ecommerce platform to make sure that they are not included in the sales reports.
## Migrating Global-e to Native App
If you are presently running live on the legacy version of Global-e’s Shopify integration, a.k.a the “hosted checkout”, you must migrate to the latest version where Global-e is natively integrated into Shopify’s checkout.
These are the key changes to Shopify order data:
* **Order transaction** is no longer per B2B transaction in a single currency, but per customer B2C transaction instead with presentment currency and shop currency. The B2B VAT is no longer reflected in Shopify.
* **Order id** – Shopify order\_name no longer starts with ‘GE’ (e.g, GE2034304US). Orders name is now assigned by Shopify same as for domestic orders (eg., #1234). The Global-e order id is available, see below “From the “Additional Details” section in order data”
* **Shipping lines/code** is now standardized by Shopify as explained in the previous section.
* **Shipment confirmation emails** no longer come from Global-e but instead are managed by Shopify/merchant.
* **Fraud approval** no changes to this flow, still relying on the payment status “pending” (before fraud check) and a subsequent update to “paid” status upon fraud approval with the addition of an order tag “Globale::Approved”
* **Payment gateway** no longer shows ‘globale’, instead:
* **Global-e Payment (INT)** when installing the Global-e payment method in production mode.
* **Global-e Payments** when installing the Global-e payment method in test mode.
**From the “Additional Details” section in order data**
The Global-e order is still available in Shopify, however not upon initial order creation and only as a note\_attribute, which is updated by the Global-e Shopify app a few seconds post-order creation.
**Example**
```
"order": {
"id": 4525092405308,
"name": "#1976",
"note_attributes": [
{
"name": "GEOrderId",
"value": "GE10071428326US"
}
```
If you do not wish to include replacement orders in your sales reports, you may need to perform modifications on your ecommerce platform to make sure that they are not included in the sales reports.
## Migrating Global-e to Native App
If you are presently running live on the legacy version of Global-e’s Shopify integration, a.k.a the “hosted checkout”, you must migrate to the latest version where Global-e is natively integrated into Shopify’s checkout.
These are the key changes to Shopify order data:
* **Order transaction** is no longer per B2B transaction in a single currency, but per customer B2C transaction instead with presentment currency and shop currency. The B2B VAT is no longer reflected in Shopify.
* **Order id** – Shopify order\_name no longer starts with ‘GE’ (e.g, GE2034304US). Orders name is now assigned by Shopify same as for domestic orders (eg., #1234). The Global-e order id is available, see below “From the “Additional Details” section in order data”
* **Shipping lines/code** is now standardized by Shopify as explained in the previous section.
* **Shipment confirmation emails** no longer come from Global-e but instead are managed by Shopify/merchant.
* **Fraud approval** no changes to this flow, still relying on the payment status “pending” (before fraud check) and a subsequent update to “paid” status upon fraud approval with the addition of an order tag “Globale::Approved”
* **Payment gateway** no longer shows ‘globale’, instead:
* **Global-e Payment (INT)** when installing the Global-e payment method in production mode.
* **Global-e Payments** when installing the Global-e payment method in test mode.
**From the “Additional Details” section in order data**
The Global-e order is still available in Shopify, however not upon initial order creation and only as a note\_attribute, which is updated by the Global-e Shopify app a few seconds post-order creation.
**Example**
```
"order": {
"id": 4525092405308,
"name": "#1976",
"note_attributes": [
{
"name": "GEOrderId",
"value": "GE10071428326US"
}
```